Welcome to the official Janome.com Blog Page!

  • 2/4/2020

    We love when Kimberly stops into local Janome dealers as she is traveling around teaching, speaking or vacationing. And while Kimberly was in Ohio recently with family, she stopped into the ever-so-amazing Pins and Needles location in Middleburg (don’t worry, Pins and Needles has 3 locations chalk full of the more wonderfulness).


    With classes, bolts of fabric, threads, notions and, of course, a whole line-up of Janome machines for anyone to test-drive right as they walk in the door, Kimberly was struck with the passion that was oozing from this dealer. Head to Kimberly’s blog to read more about her highlights, see more photos from her drop-in shop-stop number 10!

  • 1/24/2020

    Sarah set out to make her son, Joshua, a perfectly fitted button down shirt for Christmas. Armed with her new Continental M7, not only was the shirt precisely sewn but the buttonholes were simply easy thanks to the Acuspark app that walked her through every step of the process. 

    Sarah's step-by-step of how to use Acuspark to make a perfect and precise buttonhole: 

    There are a couple screens of buttonhole options, but I used the basic one. Note the QR code in the bottom left corner (more info below).

    First, you can select from a wide variety of buttonholes. I went for the standard (after all, I hadn’t sewn a buttonhole in over two decades!). Using the AcuSpark app (free on the App store, works with the M7 and a few other Janome’s), you open the app on your phone/device, scan the QR code in the bottom right of the machine’s screen (photo on left). This takes you to a tutorial within the app.

     As you can see from the screen shots, the tutorial walks you through the process step by step. Easy peasy…my kind of sewing!
    Here’s the app telling you how to make a buttonhole!


    This is what that buttonhole foot looks like in real life. You slide the button into the back, attach the foot to the machine, and it makes the perfect sized hole every time. I kid you not, I make SEVEN buttonholes, perfectly, in seven minutes, and most of that was repositioning to the next spot!


    More instructions on attaching and using the special buttonholer foot.


    This Nancy Zieman (oh how I miss her!) tool from Clover is an improvement over the old-school metal one. Although I have a fondness for the metal one, this version allows you to center the ruler exactly on the button band and mark your buttonholes. The darker green slider notches into the grooves so it doesn’t slide up and down the center as you work. I wondered when I bought it why I thought I needed a newer (plastic, yuck) version. Now I know. Once again, smarter sewing.


    Ended in perfect precision!

    LOOKIT how perfect that turned out! The only thing I would change on the next one (and yes there will be more for both sons) is to use a slightly less crisp interfacing so the collar stand holds up but isn’t quite so stiff.

    So, with 50 years of sewing experience (albeit minimal garment making in the past three decades), an excellent pattern that taught this greying sew-ist a couple new things, and the incredible precision of the Janome M7 Continental machine, I am a seriously happy camper. Even better, Joshua loves his shirt!

  • 12/3/2019

    Written by: Liz Thompson, National Education Manager-Canada 

    The Holiday season is upon us. We will be wrapping gifts, hanging tinsel and generally making things look pretty and seasonal in our homes – right?


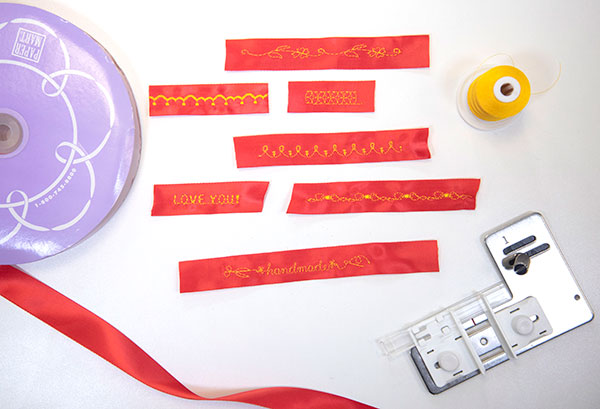
    With all of that decorating in mind, we wanted to remind you about a very nifty Janome Accessory, the Ribbon Sewing Guide, which will assist you decorating and embellishing your ribbons – customize gift wrapping with names and more.

    This accessory fits most of our sewing machines – it screws directly into the needleplate. Because the guide attaches to the needle plate it does not matter whether your machine is high shank or low shank or 9mm wide or 7mm wide. Please check with your local Janome Dealer if you are unsure of how to attach it. More information on the Ribbon Sewing Guide can be found here.

    There are 2 different length screws and 2 different thicknesses of little rubber pads. Please follow the instructions on the Blister package for this Accessory to know which screw and which pad is to be used for your specific Janome sewing machine. The pad goes under the ribbon guide and the screw goes through the guide and pad to attach it to the needle plate.

    The white double sided guide (like 2 little “walls”) encloses the sides of the ribbon or tape and adjusts wider or narrower to perfectly accommodate ribbons or tapes. You can even make your own ribbons from scrap fabric if you wish. There is also a clear plastic guide, rather like a long clip guide, which secures the ribbon to further guide it straight. When all is in place, the ribbon or tape feeds through under the foot of the machine and your embellishment is perfectly positioned as it sews. You can use your alphabets/lettering to sew messages like Happy Birthday or Merry Christmas. Even add the name of the person who will receive the gift the ribbon is attached to! Or decorate a plain ribbon with pretty decorative stitching on your sewing machine - a perfect way to utilize all of the built-in decorative stitches you don't often get to use!
    TIP: If you are using a very soft or silky ribbon (which most ribbons are), we highly recommend you use a strip/piece of our Madeira WATER SOLUBLE stabilizer (Avalon) under the ribbon on sewing guide, and above the needle plate, ie between the accessory and needle plate. This will stabilize the soft ribbon and your stitching will not pucker or distort. Alternatively, you could spray the ribbon with a liquid stabilizer to firm it up. Press dry before sewing on the ribbon. We would not suggest a tearaway stabilizer as you would not want to pick all that stabilizer out from the back of the ribbon afterwards. Water soluble stabilzer will just peel away easily and any remaining bits can be spritzed with water. Press the ribbon with a cool iron and press cloth when you are done embellishing.

Prev ... 21 22 23 24 25 26 Next 

Tags

#freesewingtutorial 4th of July Applique Block of the Month Bunny Carolina Oneto Christmas Continental M7 Cosplay Cosplay Tutorial Costume Crafting Decorative Stitches DIY DIY Accessories DIY Father's Day Gift DIY skirt Embroidery Everyday Applique Father's Day Fiesta Weave Lunch Mats Fiesta! Four Fabric Quilted Project Bag Free Bag Pattern Free Pattern Free Quilt Pattern Free Sewing Free Sewing Pattern Free Sewing Tutorial free skirt tutorial Free tutorial Fun Projects Garment Sewing Good Tidings Quilt Along Green Goddess Dress Handmade Gifts Heidi Proffety Historical Costume Tutorial Holiday Sewing Home Decor How To How to Machine Bind How to Make a Quilt How to Make a Quilt. Free Quilt Pattern How to Make Panties How to Quilt How to Sew How to sew a top Janome Janome 9450 Janome AirThread2000D Janome Artisan Janome Artistic Digitizer Janome Conitential M7 Janome Continental M7 Janome HD3000 Janome Maker Janome MamoryCraft 15000 Janome MemoryCraft 15000 Janome MemoryCraft 6700p Janome S9 Janome Sewing Machine Janome Skyline S7 Janome Skyline S9 JanomeHD9 Lifestyle Machine Embroidery Maureen Cracknell MDW Melanie Call Memory Craft 15000 Moon Garden QAYG Quilt Block Mother's Day gift Napkins Patriotic Pattern Pillow Pillows Project QAYG Quilt Block Quilt Quilt As You Go Quilt Block Quilt Block Pattern Quilted Project Bag Quilting Quilting How to Quilt Rainbow Block of the Month Rainbow Quilt Block of the Month Rainbow Quilt BOM Reversible Zippered Pillow Rolled Hem Foot Scrappy Star Pillow Sew Sewing Sewing Machine Sewing Project Sewing Tutorial Skyline S9 SkylineS9 Stuffie Summer Sewing Project The Hype Tutorial Valentine's Day
DEALERS
The TWO Closest Dealers to you are:
196 Boston Post Road , Orange CT, 06477
203-878-1654
19 PUTNAM AVENUE , PORT CHESTER NY, 10573
914-934-2934
Find Additional Dealers