Welcome to the official Janome.com Blog Page!

  • 7/15/2021

    We are very fortunate to have so many talented Cosplayers in the Janome Maker Program. It is inspiring to learn how they create spectacular costumes by thinking outside of the box, using items that are not typically thought of as sewing fabrics, and somehow making it all come together seamlessly! 


    Janome Maker Nipah Dubs wanted to create a chainmail top for his latest  Warrior of Light Paladin cosplay that is attainable for everyone! Get ready to be astounded at the look he accomplished and then try it yourself! Thank you, Nipah for this great tutorial! 


    It's REALLY easy and gets the idea of chainmail across rather well in my opinion without needing to spend a lot of real chainmail and also not having to deal with the weight/bulk chain mail has.


    Materials

    • Non-slip rug mat

    • Baby Powder 

    • Rustoleum Silver spray paint 

    • Design Masters Floral Spray (Black)

      Hey guys, I wanted to share with you how I went about making my chainmail for my Warrior of Light Paladin cosplay. It's REALLY easy and gets the idea of chainmail across rather well in my opinion without needing to spend a lot of real chainmail and also not having to deal with the weight/bulk chain mail has.

      So first off, what is it made out of? Well, it's simply just the rubber floor matting you put under carpets so they don't slip and move around! These come in various styles but you want to get this version where it's a spaced-out grid pattern!


    Go ahead and unravel the mat and fold it over so it is double-layered, I will be making just a chainmail top so a standard sweatshirt pattern is all you need. When cutting out your pattern be sure you make it bigger than you need, that way you can take it in as you go, this material DOES NOT stretch at all and can be a pain to get on and off due to its nature being a non-slip rubber.


    I got the basic shape I needed (Again, making it much larger than myself) and now it was time to sew!


    When putting it on your machine to sew, make sure to interlock the grids so that the holes are filled in by the overlapping grid of the top layer, this way you’re not sewing into nothing.

    I used your standard Zig-Zag stitch for this, that way it would catch the fabric much easier and had less chance of messing up (ex. if I used a straight stitch it would be much harder to sew). The material is a bit hard to sew through so take your time and go slowly making sure to adjust as you work your way through.

    Repeat the last steps while taking it in and keep trying it on till you get to a point where it fits well enough on your body! You don't want it too tight where it's uncomfortable after all, just loose enough to where it's still fitted/flattering on you.

    Now comes painting! Be sure to spray in a well-ventilated area using protective gear for safety. Please read all of the manufacturer’s requirements prior to use.  Due to this project being rubber and something that will move as it is worn,  I am using Design Masters Floral spray in black, this paint is intended to be used on fake flowers and crafts that do move and bend, the paint moves with it and will NOT crack. I usually use this on boots but it also works perfectly as a base for this project. Spray evenly to give a decent coat to both sides and let it dry thoroughly. Next, I am using silver spray paint to get the look of metal. 


    One thing to note about spray paint against rubber is that it doesn't cure 100% properly due to the material, it leaves it a bit sticky but there is an easy way to get rid of the stickiness. Take some baby powder and put a portion of it inside a plastic bag, then put the top into it. Tie up the bag and shake it around for a couple of minutes, enough time to get the power on all of the spaces it needs to of the chainmail. Once you're done, take it out and shake it off to get rid of the excess powder and ta-dah, no more stickiness!


    You can opt to leave it like this if you wish but in my opinion, it's rather difficult to take on and off by slipping it over your head so I opted to do something to help with that issue. I installed a zipper down the front, it would not be seen on the cosplay, and this way it would be MUCH easier to put on. I also used a Zig-Zag stitch for this to help catch the chainmail underneath and make sure it was fully stitched onto the zipper. For extra measures, you can go over your zig-zag stitch with a straight stitch if you want!    


    I installed a zipper down the front, it would not be seen on the cosplay, and this way it would be MUCH easier to put on. I also used a Zig-Zag stitch for this to help catch the chainmail underneath and make sure it was fully stitched onto the zipper. For extra measures, you can go over your zig-zag stitch with a straight stitch if you want!

    And with that, it is done! Hope this tutorial helps you out on your cosplay adventures!


  • 7/21/2021

    It is a new week and time for the next installment of the Good Tidings Quilt Along designed by Janome Maker Melanie Call from A Bit of Scrap Stuff! 

    This week Melanie stitched up  Good Tidings Quilt Along - Patchwork Squares on her Janome Continental M7! 

    Hi Quilty Friends! I hope you had fun making all the flying geese blocks and bonus half-square triangles last week. No worries if you are behind, this week is quicker! 

    This week we will be sewing the Patchwork Squares!  Patchwork is always been a favorite of mine! Simple and looks fabulous!


    Good Tidings Quilt Flying Geese Instructions (HERE).  I hope you are joining as there are AMAZING PRIZES from Riley Blake Designs, Fat Quarter Shop, and Oliso. Don't forget to share your fabric selection, cutting, and flying geese  on Instagram with the hashtag #GoodTidingsQAL

    Be sure to check my A Bit of Scrap Stuff Blog  each week as I will be sharing a new pattern section each for the FREE Good Tidings Quilt Quilt Along (schedule at end of blog post)


    Good Tidings Quilt    

    Finished size:   59.5" x 59.5"


    A Bit of Scrap Stuff Blog #ABitofScrapStuff #GoodTidingsQAL #GoodTidingsQuilt #RileyBlakeDesigns

    Patchwork Squares Instructions


    Good Tidings Quilt Along Schedule
    A Bit of Scrap Stuff Blog #ABitofScrapStuff #GoodTidingsQAL #GoodTidingsQuilt #RileyBlakeDesigns

    You can find the previous Good Tidings Quilt Along Blog Posts to get caught up by visiting:
     
    A Bit of Scrap Stuff Blog #ABitofScrapStuff #GoodTidingsQAL #GoodTidingsQuilt #RileyBlakeDesigns


    I can't wait to see your Good Tidings Quilt progress photos!!! #GoodTidingsQAL
    Be sure to follow me on Instagram @ABitofScrapStuff and on my A Bit of Scrap Stuff Blog for more fabric fun!


    Have a great day and happy quilting! 
  • 9/7/2021

    We are delighted to have Janome Canada's National Consumer Education Manager Michael Smith on the blog! Michael is an expert with all things Janome and loves to share his knowledge in Janome machines and attachments in a fun way! 

    If you have questions about which Janome sewing machine will meet all of your needs (and then some), Michael's review will probably answer many of your questions. You can also visit your local Janome Dealer to see firsthand what this machine can offer you! 


    As you know, Janome is all about giving you choices; there’s pretty much a machine for everyone! One reason you may choose to upgrade to a more advanced, computerized machine, like the Janome Continental M7 Professional is to gain some convenient, time-saving features and extra presser feet which speed up production while improving the accuracy of your results.
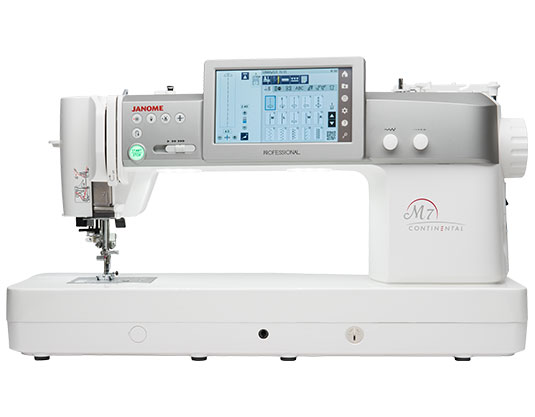
    Janome Continental M7 Professional

    My partner, Joe, recently shared with me his top 5 favourite features of the Janome Continental M7 Professional, which he used to sew a very special quilt for me as a surprise birthday present. Joe has tackled a few sewing projects before, so isn’t quite a beginner, but this is the first time he sewed an entire project all on his own, without me guiding or helping him. The Janome Continental M7 Professional was all the help he needed!

    Seeing Double Stars – a free pattern from American Patchwork and Quilting. Yes, I’m a BIG Star Wars fan!


    1/4″ Presser Foot with Guide: Janome has many presser feet which help achieve the perfect 1/4 inch seam, which is the hallmark seam allowance used in quilting. See some of the options of Janome 1/4″ presser feet on the Janome HQ You Tube channel. The Janome 1/4 inch presser foot with a guide; the “O” foot comes with the machine and was Joe’s preferred choice to piece the quilt blocks together as he liked having the guide to help improve the accuracy of his seam. He especially loved using it for the many half-square triangles which make up the star points, as he felt that helped him achieve sharp points when he sewed the blocks together.
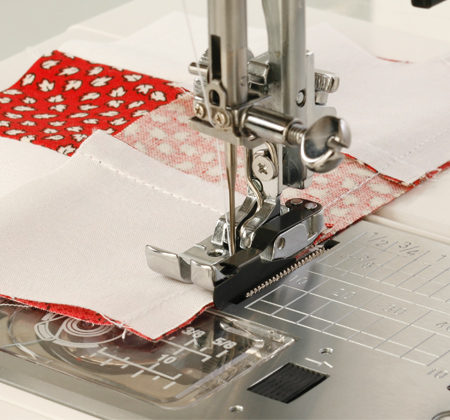
    Janome 1/4 inch Presser Foot with Guide comes with or is available for most Janome sewing machines.
    Sharp points of Half-Square Triangles are easy to achieve with the 1/4″ presser foot.

    LCD Touch Screen Controls: Along with those 1/4 inch presser feet, there are many ways to achieve an accurate 1/4 inch seam, and a computerized machine like the Janome Continental M7 Professional gives you those choices with just the touch of the screen! Given Joe sewed this quilt on the sly, without my knowledge, he didn’t want to do anything to mess up my machine, so the icons on the large LCD screen did all the machine adjustments for him without any guesswork. It’s great to have a machine do some thinking for us, which minimizes mistakes.

    Adjust stitch width to 91 needle positions; adjust stitch length; select the Auto-Pivot icon to automatically keep the needle in the fabric while lifting the presser foot, for example.
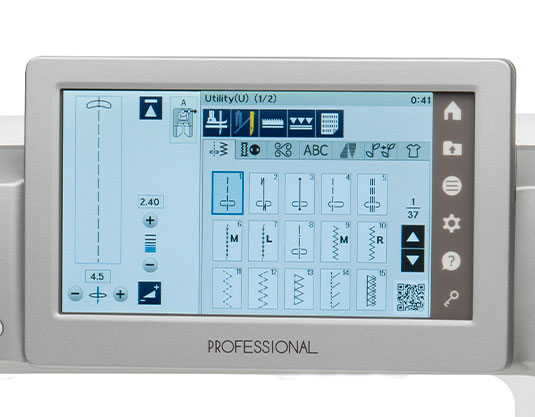
    A large 7 inch LCD touch screen makes adjusting the machine a breeze!

    Or, select the T-shirt icon for the Sewing Applications Menu, which offers a variety of automatic machine adjustments for various sewing functions, like sewing on a button or installing a zipper, and quilting functions, like Ruler Quilting, Free Motion Quilting, and Patchwork. There are sew many adjustments available at your fingertips!

    Janome Sewing Applications Menu built-in to the Continental M7 Professional saves time, and saves possible mistakes by automatically adjusting the machine
    with just the touch of the screen!

    Workspace: No matter what you’re sewing, you need an ample work area to conveniently and efficiently construct your project. The Janome Continental M7 Professional features an impressive 13.5 inches to the right of the needle by 5.5 inches high. Lots of room for a quilt of any size! Joe also appreciated having the large extension table, which comes included with the machine, so he had lots of room to support the quilt as it grew.
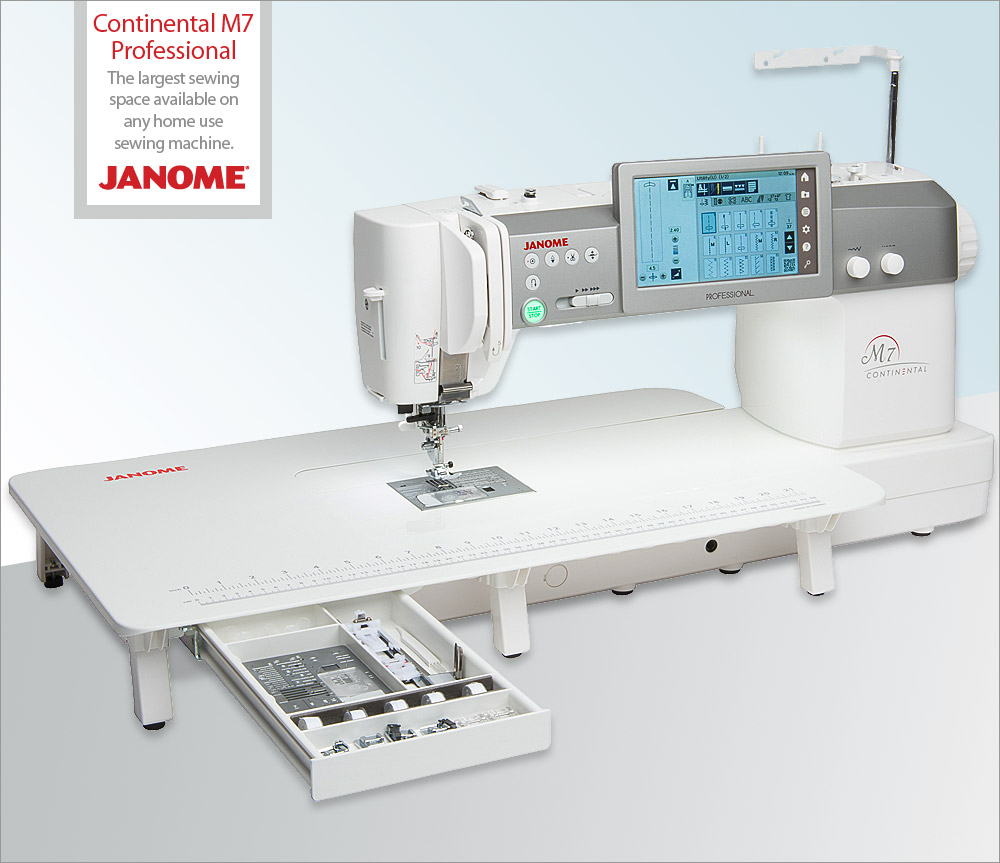
    Love, love, love that convenient accessories drawer!

    Convenient Push-Button Controls: Since Joe made this quilt while I was out of the house, time was very precious to him, so he made use of the many convenient, time-saving features of the Janome Continental M7 Professional; features which are also built-in to many electronic Janome sewing machines which any sewist will love! Reverse, Lock-Stitch, Needle Up/Down, Scissors, Auto-Presser Foot Lift, and the Speed Control lever are built-in functions conveniently arranged above the needle area, so they’re within easy reach, and help speed up production.


    Bright Lighting: Another important feature on any machine is bright lighting so we can see exactly what we’re doing. After all, you can’t achieve accurate results if you can’t see where you’re stitching! Joe loves the abundance of bright LED which washes down all over the bed of the Janome Continental M7 Professional; in the throat space and in two places around the needle. You can even adjust the brightness to suit you, so there’s less strain on your eyes. Joe was often sewing later at night, so having an ample supply of crisp LED lighting helped keep his stitching in order and helped reduce strain and fatigue on his body.

    The Instruction Manual shows how to adjust the lighting in the Settings Menu so you get it where and when you need it.
     With no lights on in the room, there’s plenty of bright LED lighting available from the Janome Continental M7 Professional.

    There are definitely more fabulous features of the Janome Continental M7 Professional which Joe has yet to discover, but he’s off to a great start now that’s he’s truly more comfortable with the machine. The overall ease of use; intuitive, feature-rich controls of the machine make it easy to see why!

    I can’t wait to receive my next quilt! (hint, hint, Joe, lol!)

    May the Force be with you in all your sewing endeavors! lol!

    Happy Sewing!


    You can test drive a Janome Continental M7 by visiting your Local Janome Dealer, find your Local Dealer HERE


Prev 1 2 Next 

Tags

#freesewingtutorial 4th of July Applique Block of the Month Bunny Carolina Oneto Christmas Continental M7 Cosplay Cosplay Tutorial Costume Crafting Decorative Stitches DIY DIY Accessories DIY Father's Day Gift DIY skirt Embroidery Everyday Applique Father's Day Fiesta Weave Lunch Mats Fiesta! Four Fabric Quilted Project Bag Free Bag Pattern Free Pattern Free Quilt Pattern Free Sewing Free Sewing Pattern Free Sewing Tutorial free skirt tutorial Free tutorial Fun Projects Garment Sewing Good Tidings Quilt Along Green Goddess Dress Handmade Gifts Heidi Proffety Historical Costume Tutorial Holiday Sewing Home Decor How To How to Machine Bind How to Make a Quilt How to Make a Quilt. Free Quilt Pattern How to Make Panties How to Quilt How to Sew How to sew a top Janome Janome 9450 Janome AirThread2000D Janome Artisan Janome Artistic Digitizer Janome Conitential M7 Janome Continental M7 Janome HD3000 Janome Maker Janome MamoryCraft 15000 Janome MemoryCraft 15000 Janome MemoryCraft 6700p Janome S9 Janome Sewing Machine Janome Skyline S7 Janome Skyline S9 JanomeHD9 Lifestyle Machine Embroidery Maureen Cracknell MDW Melanie Call Memory Craft 15000 Moon Garden QAYG Quilt Block Mother's Day gift Napkins Patriotic Pattern Pillow Pillows Project QAYG Quilt Block Quilt Quilt As You Go Quilt Block Quilt Block Pattern Quilted Project Bag Quilting Quilting How to Quilt Rainbow Block of the Month Rainbow Quilt Block of the Month Rainbow Quilt BOM Reversible Zippered Pillow Rolled Hem Foot Scrappy Star Pillow Sew Sewing Sewing Machine Sewing Project Sewing Tutorial Skyline S9 SkylineS9 Stuffie Summer Sewing Project The Hype Tutorial Valentine's Day
DEALERS
The TWO Closest Dealers to you are:
196 Boston Post Road , Orange CT, 06477
203-878-1654
19 PUTNAM AVENUE , PORT CHESTER NY, 10573
914-934-2934
Find Additional Dealers