Welcome to the official Janome.com Blog Page!

  • 7/6/2021

    It is officially mushroom season! Can you think of a better way to celebrate than to make a darling mushroom skirt? Janome Maker Vivien from Fresh Frippery is well known for her amazing historical costumes but is sharing a whimsical DIY Mushroom Skirt tutorial for you to make for any age or size! 
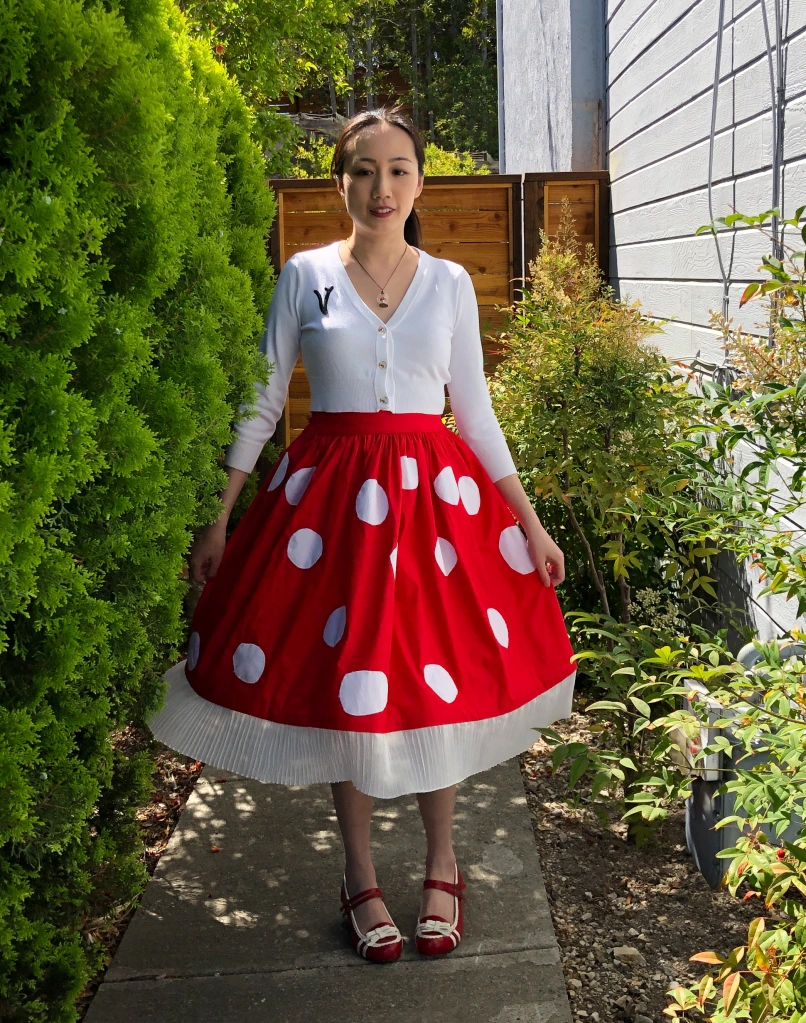
     

    I adore the red and white toadstool mushrooms known as Amanita muscaria (aka fly agaric) and wanted to make a cute skirt inspired by them. I've worn it in my photos with a monogram cardigan and big fluffy petticoat for a 1950s style look, but this skirt could be styled with a romantic shirt and a flower crown for a cottage core outfit. The front half of the skirt has a flat waistband for a smooth look while the back half of the skirt has an elasticated waistband for comfort and for adjustability!


    SKILL LEVEL: Beginner/intermediate


    TIME REQUIRED: 4-5 hours


    WHAT YOU WILL NEED (exact amounts depend on your measurements):


    • 2 or more yards of red cotton fabric
    • 1 yard or various scrap pieces of white cotton fabric
    • 3-4 yards or more of white pleated trim or lace
    • a strip of interfacing the same size as your waistband
    • thread, elastic, pins, scissors, chalk, etc.


    Before you begin you'll want to take a few basic measurements: your waist circumference, and the desired length of your skirt. For the latter, you'll want to measure from the smallest part of your waist to wherever you would like the skirt to stop (above the knee, below the knee, etc.) Use the diagram below to convert those measurements into A, B, and C for the pattern pieces.


    Using the pattern diagram as a guide, use chalk to mark the rectangles on red fabric. Cut out your front and back skirt panels, front waistband, and back waistband. Use the front waistband as a pattern to cut out a piece of interfacing the same size, then iron or sew the interfacing to the front waistband.


    Note: the 5-inch width of the waistband pieces will result in a final 2-inch tall waistband (once it is folded over with 1/2 inch seam allowances). If you want a shorter or taller waistband you can adjust the width when cutting.


    Fold the red waistband pieces in half lengthwise and iron to mark a crease down the center.


    Cut circles and ovals out of your white fabric in a variety of sizes from 3-5 inches wide. These will become the mushroom spots. The number of spots depends on personal preference and the size of your spots and skirt, but for reference, I have 28 total on my skirt.


    Pin the mushroom spots onto both the front and back skirt panels in a scattered, random pattern. Leave enough room at the top, bottom, and sides for seam allowance and hemming. (There are half inch seam allowances on the side and top, and you will want the bottom 2 inches free).


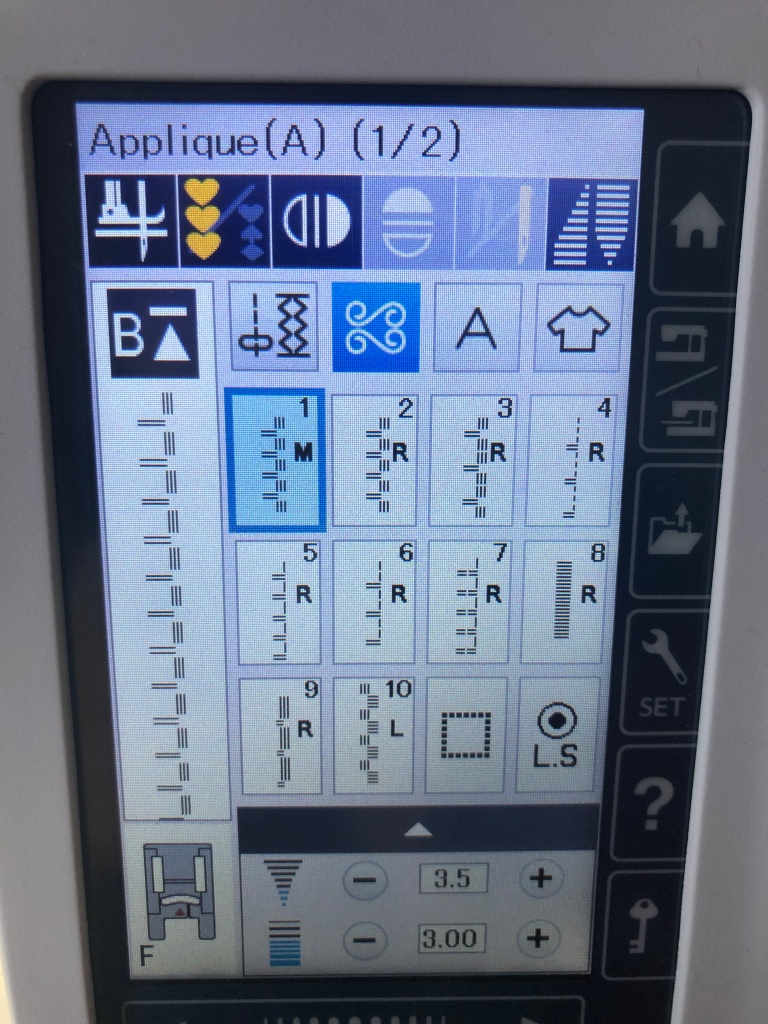
    Use your machine's appliqué stitch (shown below on my Skyline S9) to attach all the spots to your skirt panels. (If you do not have an appliqué stitch on your machine model you can use a zigzag stitch but it is recommended you use a white fabric not prone to fraying). If you are using the appliqué stitch start with your needle just outside the mushroom spots.


    Sew up the side seams and press open flat.


    ATTACHING THE BACK WAISTBAND:


    Sew the WRONG side of the back skirt panel to the RIGHT side of the back waistband with a 1/2 inch seam allowance. (This means you will start by putting one of the long edges of the waistband against the top inside edge of the skirt). You should have the ends of the waistband extend slightly past the seam. Sew down the long edge then flip up the waistband up, creating a clean finish on the inside of the skirt.
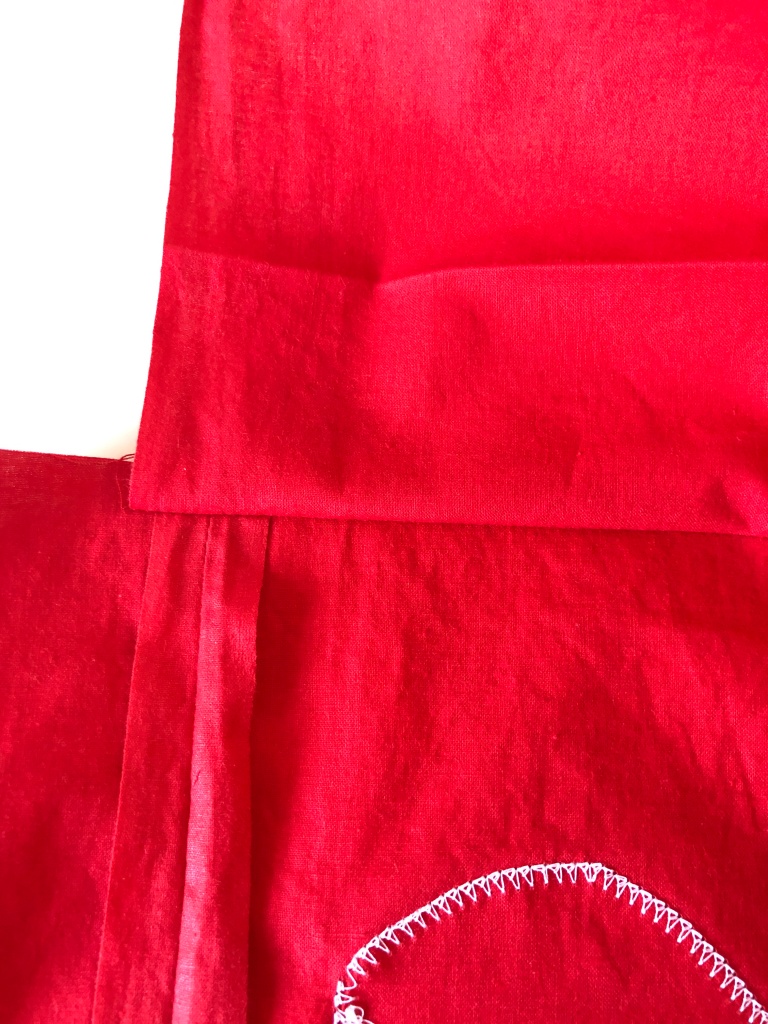


    Using the ironed center crease to help you, fold half of the waistband over towards the outside of the skirt, then tuck under the seam allowance.


    Pin down the edge of the waistband on the outside of the skirt and topstitch. You will now have a channel to thread your elastic through.


    Cut a piece of elastic the same length as what your final back waistband will be. (This is half your waist measurement plus another inch, for 1/2 inch seam allowance on each end). I used a 1-inch wide piece of elastic to reduce bulk, but you can use up to 2 inches wide if preferred.


    Insert the elastic through the back waistband channel, which will cause the waistband to gather up. (A tip: Use a safety pin to anchor one end of the elastic to the waistband so it doesn't get lost as you use a second closed safety pin attached to the other end of the elastic to thread it through the channel).


    Securely stitch down each end of the elastic inside the waistband channel.


    ATTACHING THE FRONT WAISTBAND:


    Gather the front skirt panel across the top edge into a final width equal to half your waist size. To do this, sew 2 rows of straight stitches 1/4" apart, then pull both threads at the same time to gather the skirt into the desired width.


    Attach the front waistband in a similar manner to the back waistband by first sewing the WRONG side of the skirt panel to the RIGHT side of the waistband. Make sure the ends of the front waistband (with the seam allowance folded over) overlaps the raw edges of the back waistband. Flip up the waistband and turn your skirt over to look at the outside.
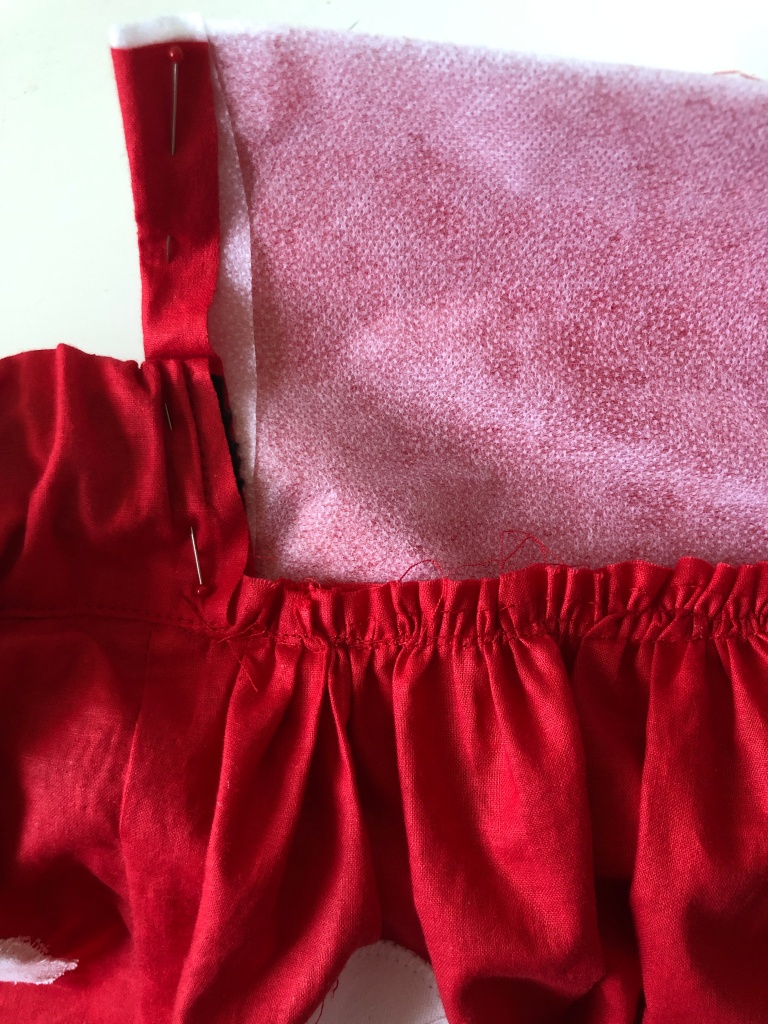


    Similar to the method used for the back waistband, flip half of the front waistband over to the outside front of the skirt, tuck in the raw seam allowance, and pin down, covering the gathered portion.


    Top-stitch the front waistband along the bottom edge and the sides where it meets the back waistband. Also top-stitch across the top edge of the entire top front/back waistbands of the skirt.
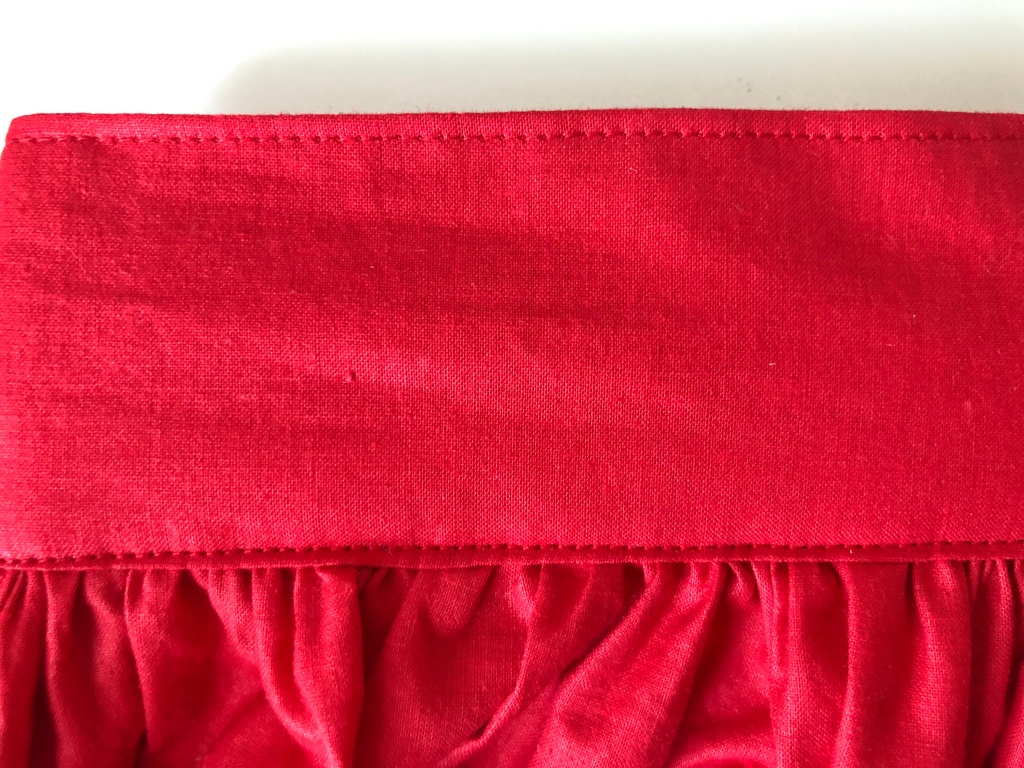


    ADDING TRIM:


    To mimic the gills of the mushroom you'll want to add trim to the hem of the skirt. I've used a pleated chiffon trim but you can also use lace or a plain white fabric ruffle.


    Measure the bottom circumference of your skirt. You will need to cut some trim the same length plus an extra inch for seam allowance. Sew the ends of the trim together to make a big circle. Pin the top edge of the trim UPSIDE DOWN to the hem of the skirt.


    Remove the original pins as you fold the bottom up, then over again, to cover all raw edges and re-pin. Stitch where the pins indicate.
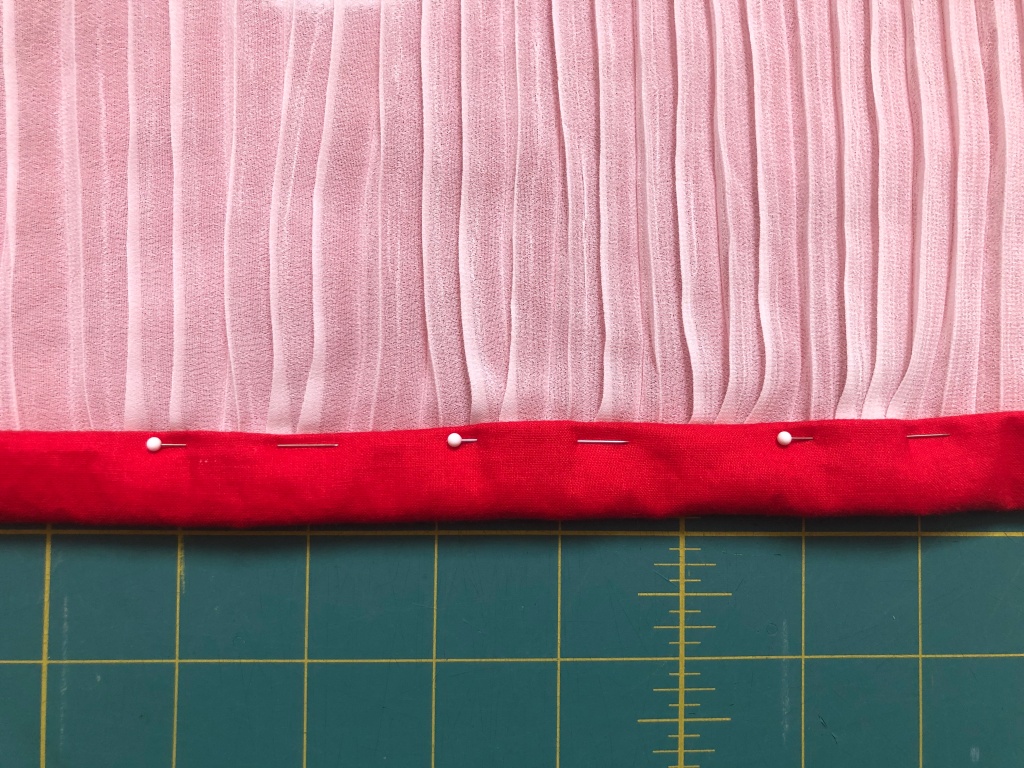


    Press the hem flat. If your trim is sheer you'll want to press the red fabric upwards behind the main skirt panel so that it doesn't hang down behind the trim. (This folded hem is to add a little extra body to the hem of the skirt. If you prefer, you can also serge the trim to the skirt but should shorten the panels and trim accordingly).


    Enjoy your mushroom skirt!


  • 8/3/2021

    Ah, the dreaded zipper! One of the most essential parts of creating bags, garments, cosplay, and home decor is also one of the most frightening for many sewing enthusiasts. We are here to say fear no more! Janome Maker Meredith Daniel from Olivia Jane Handcrafted is going to show you not only how easy it is to install a zipper by creating a zippered pocket in anything!!!  After you add zippered pouches to everything, you can use this skill builder to go forward adding zippers pillows, dresses, and so much more!


    hidden zipper pocket tutorial


    A zippered pocket is such a useful addition to any bag! Did you know they are also incredibly easy to insert? This tutorial will show you how to do just that, and you will be an expert in no time at all! 

    hidden zipper pocket tutorial


    You'll need just a couple of things:

    • the fabric you want to put a zipper pocket into
    • a zipper the length of you want your pocket opening (I'm using a 7" metal zipper)
    • a cut of fabric for your pocket (you'll need less than a fat quarter!)
    • a scrap of interfacing (I'm using SF 101)
    • a marking tool, ruler, and cutting tools

      hidden zipper pocket tutorial


    To demonstrate this technique, I'm installing a zipper on the front of my Basic Drawstring Bag. It would also make a great addition to my Mosaic Heart Tote, but you can use this to add a pocket to whatever you need! I am using my Janome Skyline S9 with a walking foot for the whole of this tutorial. That's right! You don't even need a zipper foot. Let's get started!


    Cut two pieces of interfacing 1.5"x 1" longer than your zipper. I cut a piece 1.5x8". Cut two matching pocket bags. They should be at least 1.5" longer than your zipper, and you will need at least 1" above wherever your zipper is at. I cut two pieces measuring 11x7.5".  Mark the placement of your zipper opening on the outer fabric. I find it useful to crease the fabric where I want the zipper to be, and then I have an accurate way to tell where to add interfacing.


           hidden zipper pocket tutorial   hidden zipper pocket tutorial

    Place one strip of interfacing on the wrong side of your outer fabric. Center it over where the zipper will be placed, and fuse according to the manufacturer's instructions. Repeat this on the wrong side of one pocket piece. The interfacing needs to be placed 1/2" under the top of the pocket piece. 


    **Tip: to help protect your iron and your ironing board cover, use a pressing cloth! 


      hidden zipper pocket tutorial


    Find the center of your interfaced section on the pocket piece and draw a line that is 1/4" longer than the teeth of your zipper. I marked a line 7 1/4" for my 7" zipper. Now mark two matching lines 1/4" above and below that line. You will now have three lines. Mark little triangles that reach from the outer corners to about 1/4" in on the centerline. Align your pocket piece and outer fabric right sides together so that the interfaced sections are at the same area since you will be sewing through all layers in the next step. I used clover clips to keep my fabrics still and in line. Sew around the outside rectangle that you drew, overlapping by several stitches once you reach the beginning. All the inner lines are cut lines.


                                 hidden zipper pocket tutorial     hidden zipper pocket tutorial    hidden zipper pocket tutorial


    Using very sharp scissors, cut through all layers along the centerline until you reach the triangle points, then very carefully clip along those diagonal lines to the corners. Do not clip your stitches. Turn your pocket pieces toward the inside through the hole you just cut, and press well.

                                 hidden zipper pocket tutorial


    Align your zipper within the rectangular opening, and begin stitching somewhere in the middle. You will want to use a 1/8" seam allowance since you are sewing close to the folded edge of the fabric. When you get close to the zipper pull, put your needle down, raise your presser foot, and carefully open the zipper so that you can stitch unencumbered by the bulk of the pull. You can then close it again when you need to.

                        hidden zipper pocket tutorial     hidden zipper pocket tutorial    hidden zipper pocket tutorial


    Place your remaining pocket piece right sides together with the sewn pocket piece, and pin the corners. You will now sew all the way around the pocket pieces with a 1/4" seam allowance. Move the main fabric out of the way as you sew. 

                            hidden zipper pocket tutorial    hidden zipper pocket tutorial


    You have now completed your hidden zipper pocket!

                                 hidden zipper pocket tutorial     hidden zipper pocket tutorial    hidden zipper pocket tutorial


    Give yourself a pat on the back for learning a new technique!  You can now include this skill in your sewing toolbox! 

    hidden zipper pocket tutorial  

  • 9/28/2021

    Photo Sep 21, 11 08 23 AM (2)

    A Tutorial: How to Make a Whole Cloth Quilted Pillow Cover with Envelope Style Back in Sizes 12" square to 24" Square
    Whole-cloth quilted pillows made using your Janome sewing machine is a wonderful and easy way to bring heirloom-quality style into your home, freshen up your decor, and enjoy favorite fabrics year-round, using just a few simple steps! In this tutorial, I'll show you how to use two different built-in stitches on your machine to quilt the pillow fronts and how to finish the pillow with an envelope style back in SIX different sizes. Let's get started!

    1

    Materials List:
    Janome Sewing Machine (Horizon Quilt Maker Memory Craft 15000)
    walking foot for your sewing machine (optional)
    fabric depending on the pillow size (Plaid of My Dreams by Maureen Cracknell for AGF)
    batting (Hobbs Tuscany Supreme 100% Unbleached Cotton) 
    pillow insert or pillow you'd like to cover (Hobbs Pillow Pals)
    neutral thread (Aurifil 50wt 6010, 2692)
    basting spray or basting pins
    scissors or rotary cutter/mat
    hera marker or disappearing fabric marker to premark the quilting lines (optional)
    iron
     
    Size 12" x 12" square: one 12.5" x 12.5" square for main fabric, one 14" x 14" square of batting, two pieces of fabric measuring 11.5" x 12.5" for backing fabrics, two pieces of batting 13" x 14" for backing batting
    Size 14" x 14" square: one 14.5" x 14.5" square for main fabric, one 16" x 16" square of batting, two pieces of fabric measuring 12.5" x 14.5" for backing fabrics, two pieces of batting 14" x 16" for backing batting
    Size 16" x 16" square: one 16.5" x 16.5" square for main fabric, one 18" x 18" square of batting, two pieces of fabric measuring 13.5" x 16.5" for backing fabrics, two pieces of batting 15" x 18" for backing batting
    Size 18" x 18" square: one 18.5" x 18.5" square for main fabric, one 20" x 20" square of batting, two pieces of fabric measuring 14.5" x 18.5" for backing fabrics, two pieces of batting 16" x 20" for backing batting
    Size 20" x 20" square: one 20.5" x 20.5" square for main fabric, one 22" x 22" square of batting, two pieces of fabric measuring 15.5" x 20.5" for backing fabrics, two pieces of batting 17" x 22" for backing batting
    Size 24" x 24" square: one 24.5" x 24.5" square for main fabric, one 26" x 26" square of batting, two pieces of fabric measuring 17.5" x 24.5" for backing fabrics, two pieces of batting 19" x 26" for backing batting

    Whole Cloth Pillow Supplies

    Step 1. Quilting the pillow top pillow: Layer the batting with the pillow front fabric on top facing right side up on a flat surface. Pin or use a spray to baste these two layers together.

    Baste Layers

    The first pillow example is quilted using the built-in straight quilting stitch #1 on my Janome set at a stitch width of 4.5 and stitch length of 4.0.

    Janome Sewing

    Following the plaid pattern of the fabric I created a grid-like quilting design. If using a different fabric to achieve this similar quilting pattern premark the quilting lines using a hera or disappearing ink marker before quilting.

    Quilted Pillow Front

    The second pillow example is quilted using the built-in wavy quilting stitch #8 on my Janome set at a stitch width of 9.0 and stitch length of 4.0. Adding the wavy quilting both horizontally and vertically created a really fun pattern here that really pops!

    Photo Sep 17, 6 26 52 PM

    Once quilting is complete trim away access fabric and batting to the desired pillow size. The first pillow example (beige/white gingham) is trimmed to 14" square for a 14" pillow insert. The second pillow example (black/buffalo plaid) is trimmed to 16" square for a 16" pillow insert.
    Step 2. Quilting Pillow Back Pieces: Just as you did for the pillow front, layer each backing piece of batting with the pillow back piece of fabric on top facing right side up on a flat surface. Pin or use spray to baste these two layers together for both backing pieces. Mark quilting line again if needed and quilt the same as you did for the pillow front.

    pin in place

    To hem, fold over one long edge of the top back piece about 1/4 inch and then again. Pin and sew along the folded edge and outer edge to create a double seam finish. Repeat these steps for the bottom backing piece, as well.

    hem raw edge

    double hem finish

    Step 3. Sew Together Pillow Pieces: Lay the quilted pillow front right side up on a flat surface, then layer the top quilted pillow backing piece with the right side facing the pillow front onto the pillow front, then the bottom backing piece.

    layer pillow back piece onto pillow front

    pillow backing

    Pin or clip all three layers together.

    pin in place

    Sew using a 1/4 inch seam all the way around the pillow attaching all three layers to create the pillow cover, removing pins or clips as you go.

    1/4" seam all the way around

    For extra durability I then use the zig zag stitch on my machine to sew around the entire pillow again staying close to the raw edge to reinforce the seams.

    double secure with zig zag stitch

    For nice pointed pillow corners, I then sew a small diagonal stitch on the outside of each corner and clip away each of the four corners as shown below.

    clip four corners

    Turn the pillow cover right side out and press to make it nice and smooth before adding the pillow insert.

    turn pillow cover out and press

    Carefully stuff the pillow insert inside the pillow cover. making sure to work the corners of the insert into the corners of the pillow cover. Now you're ready to admire and enjoy your handmade quilted pillow!

    insert pillow form and done!

    Photo Sep 21, 11 10 43 AM

    Care and Maintenance: Remove insert and machine wash cover in cold water; gentle cycle. Lay flat to air dry or tumble dry on the lowest heat setting; remove promptly. Use a warm iron as needed to smooth out any wrinkles before reinserted the pillow insert.

    Photo Sep 21, 11 07 23 AM

    I hope you enjoyed this tutorial!
  • 10/2/2021

    The Log Cabin block is timeless and classic! While there are hundreds of variations of the Log Cabin pattern, the simplicity of the basic Log Cabin has always been a favorite for its ease of learning for beginners! 

    Janome Maker Annabel Wrigley takes you through the steps of making a Log Cabin Pillow on her Janome Contential M7


    This is the perfect beginner-friendly sewing project that you can whip up in a jiffy. With the holidays around the corner, they make the perfect gift!
    Supply List:
    . Strips of 7 different colors. Strips need to measure 2 ¾” wide.
    . 17 x 17” batting
    . 17 x 17” backing for the quilted front.
    . 16 ¼ x 12” pieces (x2) for the pillow back
    . Basic sewing supplies


    This project is sewn with a ¼” seam allowance.
    1. Start with a center square measuring 2 ¾ x 2 ¾”
    2. Attach a second 2 ¾ x 2 ¾” square. Use the above diagram for placement.
    Press the seam open.
    3. Roughly cut the next strip (3) and attach it according to the diagram. Press the seam open and trim to size.
    4. Continue adding strips in this way, trimming and pressing as you go.
    The above diagram will show you the order of the strip sewing.
    When the log cabin is completed, you may need to give the piece another trim to square things up.
    The finished panel should measure 16 ¼ x 16 ¼.
    5. Create a quilt sandwich with batting in the middle and a piece of fabric on the back.
    I like to use a basting spray to hold everything together.
    6. Quilt the piece using your preferred quilting method. See the video below for my favorite method.

    7. Trim the extra batting and backing from the quilted front.
    8. Fold down one long edge ½” on both of the pillow back pieces. Press. Now fold that edge over again and press.
    9. Topstitch close to the edge of the fold.
    10. With the quilted front facing up, lay one side of the backing face down on top.
    11. Add the second side – they will overlap in the middle.
    12. Pin around all sides of the pillow.
    13. Sew around all sides with a ¼” seam allowance.
    14. Snip off the corners.
    To prevent fraying you can zig-zag or serge the raw edges.
    Turn the pillow right side out and add a 16" pillow form and Voila!
    Stuff with a 16" pillow form and enjoy!
Prev 1 2 Next 

Tags

#freesewingtutorial 4th of July Applique Block of the Month Bunny Carolina Oneto Christmas Continental M7 Cosplay Cosplay Tutorial Costume Crafting Decorative Stitches DIY DIY Accessories DIY Father's Day Gift DIY skirt Embroidery Everyday Applique Father's Day Fiesta Weave Lunch Mats Fiesta! Four Fabric Quilted Project Bag Free Bag Pattern Free Pattern Free Quilt Pattern Free Sewing Free Sewing Pattern Free Sewing Tutorial free skirt tutorial Free tutorial Fun Projects Garment Sewing Good Tidings Quilt Along Green Goddess Dress Handmade Gifts Heidi Proffety Historical Costume Tutorial Holiday Sewing Home Decor How To How to Machine Bind How to Make a Quilt How to Make a Quilt. Free Quilt Pattern How to Make Panties How to Quilt How to Sew How to sew a top Janome Janome 9450 Janome AirThread2000D Janome Artisan Janome Artistic Digitizer Janome Conitential M7 Janome Continental M7 Janome HD3000 Janome Maker Janome MamoryCraft 15000 Janome MemoryCraft 15000 Janome MemoryCraft 6700p Janome S9 Janome Sewing Machine Janome Skyline S7 Janome Skyline S9 JanomeHD9 Lifestyle Machine Embroidery Maureen Cracknell MDW Melanie Call Memory Craft 15000 Moon Garden QAYG Quilt Block Mother's Day gift Napkins Patriotic Pattern Pillow Pillows Project QAYG Quilt Block Quilt Quilt As You Go Quilt Block Quilt Block Pattern Quilted Project Bag Quilting Quilting How to Quilt Rainbow Block of the Month Rainbow Quilt Block of the Month Rainbow Quilt BOM Reversible Zippered Pillow Rolled Hem Foot Scrappy Star Pillow Sew Sewing Sewing Machine Sewing Project Sewing Tutorial Skyline S9 SkylineS9 Stuffie Summer Sewing Project The Hype Tutorial Valentine's Day
DEALERS
The TWO Closest Dealers to you are:
1900 CENTRE ST , WEST ROXBURY MA, 02132
(617)323-6200
443 MOODY STREET , WALTHAM MA, 02453
781-893-3331
Find Additional Dealers