Welcome to the official Janome.com Blog Page!

  • 10/19/2020

    Hello! My name is Jessee, and this is my first post here on the Janome Blog. I'm super excited!

    To give a little bit of background...

    I have been sewing since I was 5 years old and I come from a family of makers. My mom is a seamstress and my sisters all make their own clothes. I myself have had a maker business for the past 18 years under the name Art School Dropout. I make everything from 3D printed pieces, laser cut jewelry, cast plastic accessories, quilt patterns & quilts, wood pieces, embroidered pieces and more. I also teach these things at a local makerspace and I'm a girl scout leader! Basically my  whole life revolves around being a maker.

    Lately my maker habits have pushed me towards Conventions and Cosplay. My family and I go to all of the local conventions around the Washington DC area and I even sell at a few. So when I was thinking about what my first project would be, I thought of the trends I'd see at these events.  I noticed a bunch of Kawaii (cute) embroirdered wool berets at different booths last year. They'd have cut animals, fruit or something else anime themed dancing around them. A few even had ribbon borders and cute bows. My 10 year old daughter loved them anbd kept asking for one.

    Which brings me to today's tutorial...

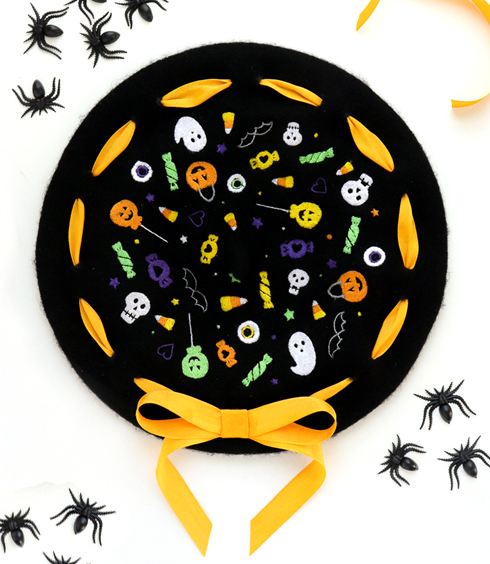
    How to Machine Embroider a Kawaii Halloween Beret!

    You'd think the process was a no brainer, but these wool berets can get tricky to machine embroider. It took some trial and error with both the file and the technique to get it just right. I also went through a handful of berets! oops.

    Now lets get started with a supply list...

    You will need:

    • A Janome Embroidery Machine that can use the SQ23 230x230 Hoop (I am using the MC15000)
    • An 11" wool beret (I bought mine off of Amazon since I'm still staying home 24/7)
    • Embroidery thread in Yellow, Orange, Bright Purple, Slime Green, White and Medium Grey
    • A stiletto tool or a 'That Purple Thang'
    • Peel & Stick stabilizer (I used Pellon)
    • Scissors
    • 1/4" or 1/2" Ribbon (optional)
    •  Fabric Fusion Glue or a Glue Gun (optional)
    • A white gel pen or silver sharpie marker (optional)
    • A large upholstrey or needlework needle (optional)


    First things first, lets untighten the embroidery hoop and get it ready!


    Next you will want to measure how much of the Peel & Stick stabilizer you will need. I always cut a little extra just in case.

    Place it in your hoop with the paper side up! This is very important.


    Now using your stiletto or a pair of scissors open, score some lines around the paper. You will want to cut through the paper, but not the stabilizer underneath. I always say it's better to score a few times than to push too hard and cut through on the first time around.

    The scoring should have allowed you to start peeling off the paper. Make sure to get as much off as possible.

    To make the beret easy to embroider, you will need to turn it inside out. Once you have done so, try and center it on the hopp using the raised lines on each side of the hoop. It's fine if it's not perfect, we'll do some more wiggling around in the next step.


    Your hoop should have come with a clear centering template like shown above. This is absolutely perfect for this project, since you will now try and center the little nub on the beret with the hole in the center of the template. Make sure the template mactches up with those notches on the hoop! This will save you heartache later.

    Once you are comfortable with the placement of the beret, press down as much as possible to make sure it doesnt shift on the machine.
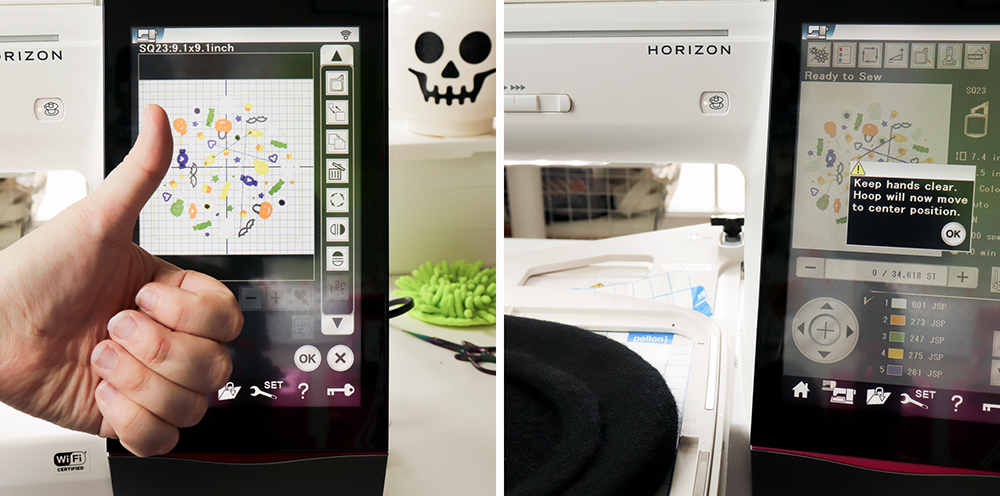
     Now load up the Halloween Beret file and get started! It has already been sized perfectly to fit on the beret AND to account for the inside flaps with some assistance.

    Please note that this is a 65min embroidery job and it will need constant babysitting due to those flaps, but I promise you it will be worth it in the end.
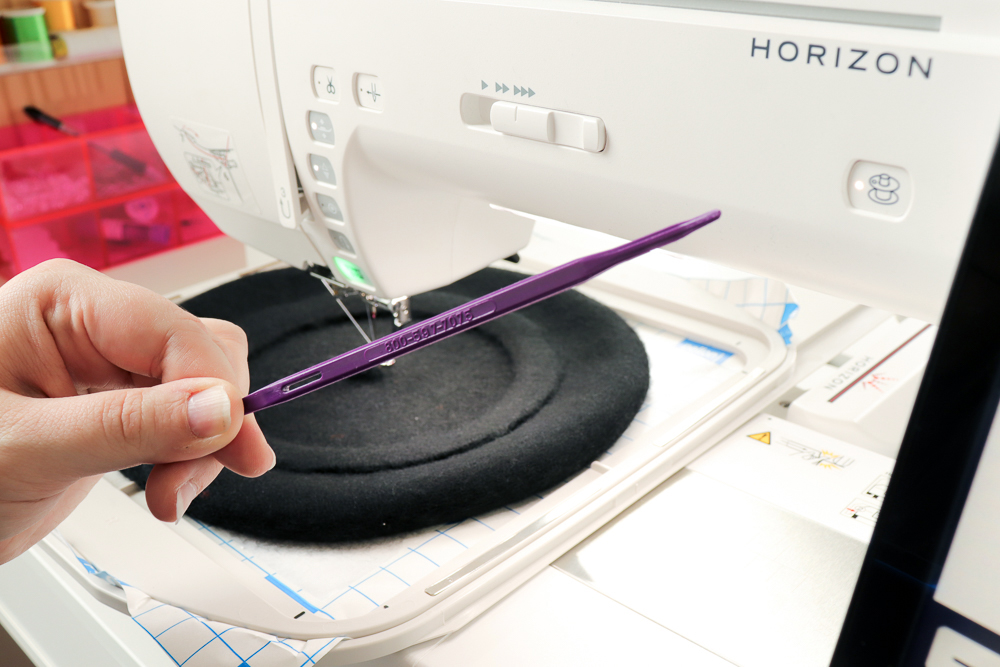
     

    Now I bet you were wondering what I was talking about it the supply list when I wrote "That Purple Thang'. Well, this was it! It's one of my most used tools and is almost crucial for this project. It's a plastic slightly curved stiletto that can also be used to thread ribbon and elastic as well as push out corners in sewn pieces.

    For this project we are using it to move the flaps on the beret to the side while the machine is going. This allows for zero interference with the needle and carriage, as well as keeping our hands as far away as possible.

    Thats a must! I have def sewn through my finger with both a sewing machine and a longarm machine. I don't wish that grossness on my worst enemy.

    A regular sewing stiletto will also work for this btw, I'm just a fan of 'That Purple Thang' (plus I just really like saying "Thang")
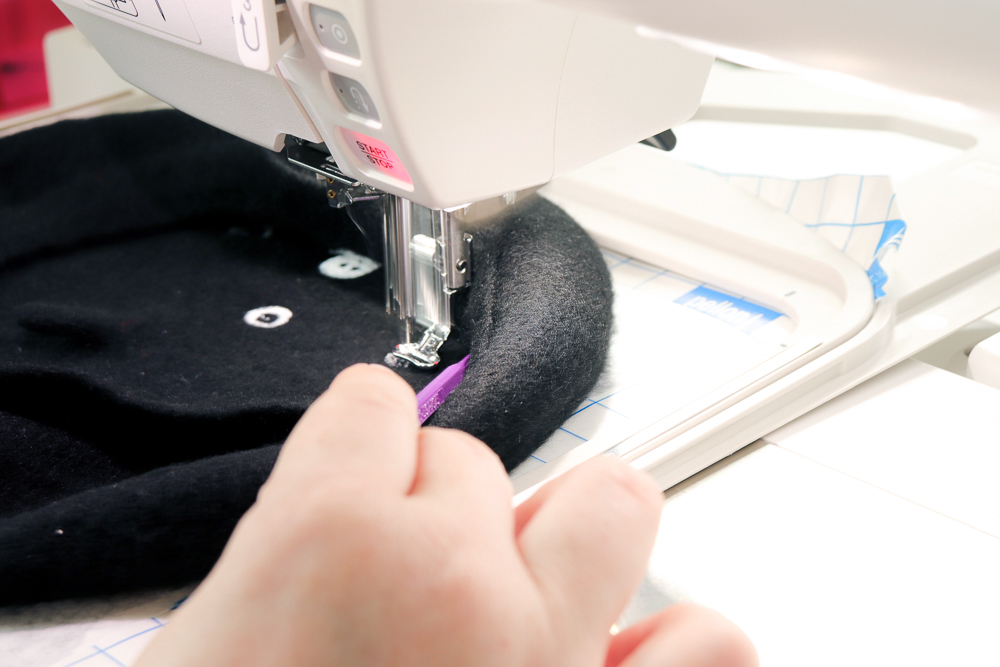
     

    Once you have sat and watched the embroidery machine work it's magic, you could be 100% finished and go about your day wearing your new magical halloween beret.

    You could also take it one more step, which is what my daughter requested, and add some fun ribbon around the edge!

    To make this easier, I have included a printable template for positioning the ribbon. I wanted to help you and take out any guess work. It will print out on two pages, so you will need to cut it out and tape it together. Make sure to match up the shapes with the stars inside. Please note: It is an inch smaller than the actual beret. I did this so there were only two pages to print instead of four.

    To accomplish the ribbon look, you can use either 1/4" or 1/2" ribbon. We used 1/2" because thta is what my daughter picked out. I personally wanted to go with gold, but she is the one who will be wearing this.

    DOWNLOAD the ribbon template HERE!

    Once your template is taped together, you will need to poke holes in all the circles. My hole punches all mysteriously dissapeared, so I just used the tips of my scissors, but a hole punch would be so much nicer!

    Now center the template and line up where you would like the bow to go. Once you are happy with the placement, use a white gel pen or a silver sharpie to mark where each hole should go.

    Side note: I tried to use chalk, a dressmakers pen, and a chalk pencil but none of them would leave nice enough marks.


     We're almost done! I promise!

    I left the ribbon the spool and threaded it into my large upolstrey needle. I started inside at the part where the bow was going to go and just when in and out all the way around the beret. If the needle isn't big enough to make a hole for the ribbon, you can cut little slits. I personally only had to do that twice.

    When you get to the end it make look a little sloppy, mine did. I just went around and straightened it all up and opened the robbon so it was "puffier" looking.  To keep this look and to prevent movement later, I dabbed a glob of Fabric Fusion glue under each piece os ribbon.

    From here you can tie a pretty bow, glue the and go about your day. You could also struggle with tying a pretty bow and instead tie it off, make a seperate bow and hot glue it on. Your choice!

    Ta-Da! You now have a super cute Kawaii Halloween Beret to wear this spooky season OR year 'round. I don't judge.


    Bonus: I've added two extra files to this project incase you want to add them to some cute accessories or the top left corner of a shirt. Pretty much anywhere a 75mm wide design will fit! I know I'll be adding those ghosts to a simple sweatshirt and wearing it year 'round.

    All of the files for this project can be found on our Janome Projects page HERE!

  • 10/19/2020

    Hello! My name is Jessee, and this is my first post here on the Janome Blog. I'm super excited!

    To give a little bit of background...

    I have been sewing since I was 5 years old and I come from a family of makers. My mom is a seamstress and my sisters all make their own clothes. I myself have had a maker business for the past 18 years under the name Art School Dropout. I make everything from 3D printed pieces, laser cut jewelry, cast plastic accessories, quilt patterns & quilts, wood pieces, embroidered pieces and more. I also teach these things at a local makerspace and I'm a girl scout leader! Basically my  whole life revolves around being a maker.

    Lately my maker habits have pushed me towards Conventions and Cosplay. My family and I go to all of the local conventions around the Washington DC area and I even sell at a few. So when I was thinking about what my first project would be, I thought of the trends I'd see at these events.  I noticed a bunch of Kawaii (cute) embroirdered wool berets at different booths last year. They'd have cut animals, fruit or something else anime themed dancing around them. A few even had ribbon borders and cute bows. My 10 year old daughter loved them anbd kept asking for one.

    Which brings me to today's tutorial...

    How to Machine Embroider a Kawaii Halloween Beret!

    You'd think the process was a no brainer, but these wool berets can get tricky to machine embroider. It took some trial and error with both the file and the technique to get it just right. I also went through a handful of berets! oops.

    Now lets get started with a supply list...

    You will need:

    • A Janome Embroidery Machine that can use the SQ23 230x230 Hoop (I am using the MC15000)
    • An 11" wool beret (I bought mine off of Amazon since I'm still staying home 24/7)
    • Embroidery thread in Yellow, Orange, Bright Purple, Slime Green, White and Medium Grey
    • A stiletto tool or a 'That Purple Thang'
    • Peel & Stick stabilizer (I used Pellon)
    • Scissors
    • 1/4" or 1/2" Ribbon (optional)
    •  Fabric Fusion Glue or a Glue Gun (optional)
    • A white gel pen or silver sharpie marker (optional)
    • A large upholstrey or needlework needle (optional)


    First things first, lets untighten the embroidery hoop and get it ready!


    Next you will want to measure how much of the Peel & Stick stabilizer you will need. I always cut a little extra just in case.

    Place it in your hoop with the paper side up! This is very important.


    Now using your stiletto or a pair of scissors open, score some lines around the paper. You will want to cut through the paper, but not the stabilizer underneath. I always say it's better to score a few times than to push too hard and cut through on the first time around.

    The scoring should have allowed you to start peeling off the paper. Make sure to get as much off as possible.

    To make the beret easy to embroider, you will need to turn it inside out. Once you have done so, try and center it on the hopp using the raised lines on each side of the hoop. It's fine if it's not perfect, we'll do some more wiggling around in the next step.


    Your hoop should have come with a clear centering template like shown above. This is absolutely perfect for this project, since you will now try and center the little nub on the beret with the hole in the center of the template. Make sure the template mactches up with those notches on the hoop! This will save you heartache later.

    Once you are comfortable with the placement of the beret, press down as much as possible to make sure it doesnt shift on the machine.

     Now load up the Halloween Beret file and get started! It has already been sized perfectly to fit on the beret AND to account for the inside flaps with some assistance.

    Please note that this is a 65min embroidery job and it will need constant babysitting due to those flaps, but I promise you it will be worth it in the end.


    Now I bet you were wondering what I was talking about it the supply list when I wrote "That Purple Thang'. Well, this was it! It's one of my most used tools and is almost crucial for this project. It's a plastic slightly curved stiletto that can also be used to thread ribbon and elastic as well as push out corners in sewn pieces.

    For this project we are using it to move the flaps on the beret to the side while the machine is going. This allows for zero interference with the needle and carriage, as well as keeping our hands as far away as possible.

    Thats a must! I have def sewn through my finger with both a sewing machine and a longarm machine. I don't wish that grossness on my worst enemy.

    A regular sewing stiletto will also work for this btw, I'm just a fan of 'That Purple Thang' (plus I just really like saying "Thang")


    Once you have sat and watched the embroidery machine work it's magic, you could be 100% finished and go about your day wearing your new magical halloween beret.

    You could also take it one more step, which is what my daughter requested, and add some fun ribbon around the edge!

    To make this easier, I have included a printable template for positioning the ribbon. I wanted to help you and take out any guess work. It will print out on two pages, so you will need to cut it out and tape it together. Make sure to match up the shapes with the stars inside. Please note: It is an inch smaller than the actual beret. I did this so there were only two pages to print instead of four.

    To accomplish the ribbon look, you can use either 1/4" or 1/2" ribbon. We used 1/2" because thta is what my daughter picked out. I personally wanted to go with gold, but she is the one who will be wearing this.

    DOWNLOAD the ribbon template HERE!

    Once your template is taped together, you will need to poke holes in all the circles. My hole punches all mysteriously dissapeared, so I just used the tips of my scissors, but a hole punch would be so much nicer!

    Now center the template and line up where you would like the bow to go. Once you are happy with the placement, use a white gel pen or a silver sharpie to mark where each hole should go.

    Side note: I tried to use chalk, a dressmakers pen, and a chalk pencil but none of them would leave nice enough marks.


     We're almost done! I promise!

    I left the ribbon the spool and threaded it into my large upolstrey needle. I started inside at the part where the bow was going to go and just when in and out all the way around the beret. If the needle isn't big enough to make a hole for the ribbon, you can cut little slits. I personally only had to do that twice.

    When you get to the end it make look a little sloppy, mine did. I just went around and straightened it all up and opened the robbon so it was "puffier" looking.  To keep this look and to prevent movement later, I dabbed a glob of Fabric Fusion glue under each piece os ribbon.

    From here you can tie a pretty bow, glue the and go about your day. You could also struggle with tying a pretty bow and instead tie it off, make a seperate bow and hot glue it on. Your choice!

    Ta-Da! You now have a super cute Kawaii Halloween Beret to wear this spooky season OR year 'round. I don't judge.
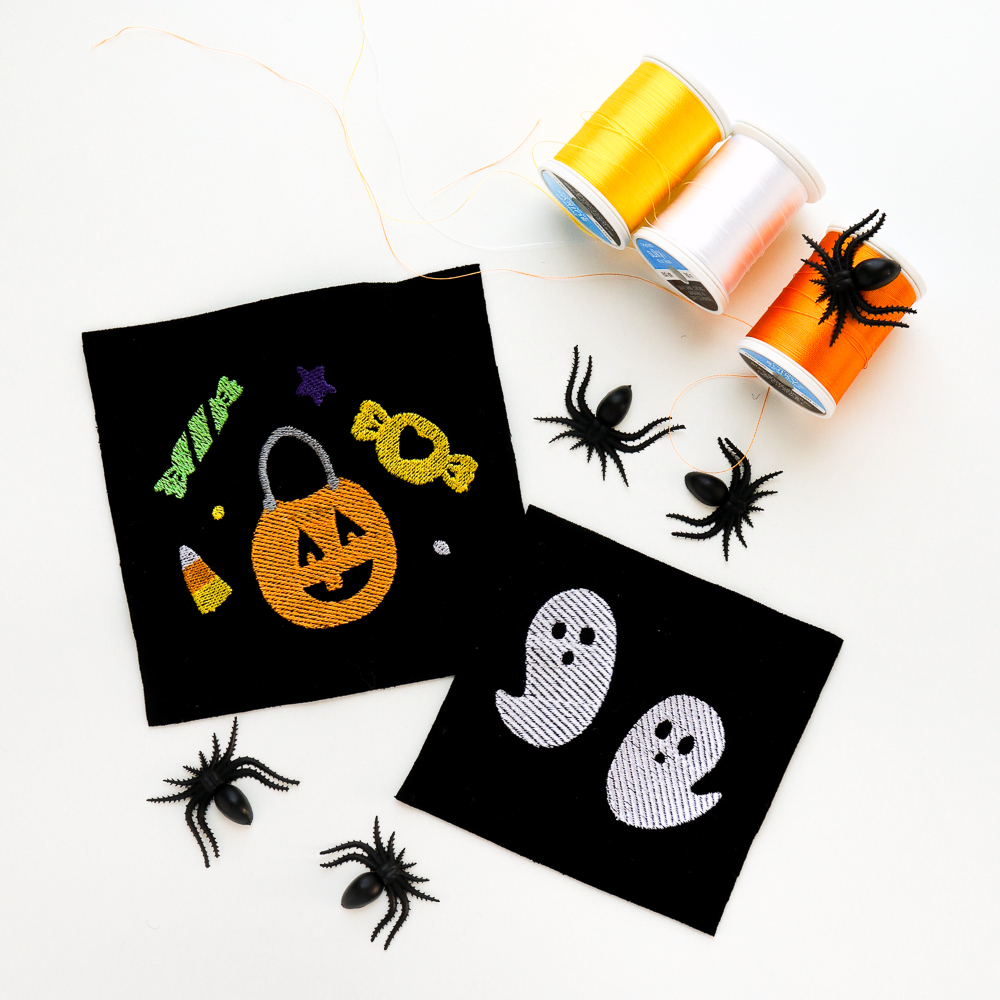
     

    Bonus: I've added two extra files to this project incase you want to add them to some cute accessories or the top left corner of a shirt. Pretty much anywhere a 75mm wide design will fit! I know I'll be adding those ghosts to a simple sweatshirt and wearing it year 'round.

    All of the files for this project can be found on our Janome Projects page HERE!

  • 10/15/2020

    By: Danielle Amato

    So I've had this nautical striped interlock knit fabric sitting in my fabric cabinet for who knows low long. Every time I opened the cabinet, it would remind me that it was dying to be turned into some kind of nautical/beach-y/summer-y garment. So- no time like the present right?

    I gave myself the time I needed to get back into what it felt like to be in design school again and let myself drape the fabric on my dress form. It felt so good to be creating something again all based on my own judgements of how the fabric fit on the dress form.

    While draping a bodysuit may not be the peak of creativity, it reenergized me to want to get back into it, and do bigger and better things.

    If you are new to draping, draping with knit fabric is a great place to start because it is very forgiving when it comes to fit and silhouette and you don't always need to worry about anything too technical such as darts (unless you want them in your design).

    And if you'd like to make your life even EASIER, I suggest using the Janome Airthread 2000D. It is the easiest thing to thread and makes sewing with knits a complete breeze. I love Janome machines with all of my heart and soul, so this one is a must.


    PREPARATION OF FABRIC:

    You want to make sure that your cross grain is running horizontal to the body (this direction will typically have the most stretch).

    You will need two pieces of fabric, front and back.

    -The length will be the measurement from the neck band to the hipline, plus 5 inches.

    -The width will be the fill width across the front (from side seam to side seam at hipline), plus 8 inches.

    Find the center front and center back of each piece by folding them in half. I folded my pieces in half and pressed them to make a crease down the center so I didn't have to make any marks on my fabric.

     DRAPING STEPS:

    • Pin the front piece to the dress form along center front with your centered crease line.
    • Smooth the fabric across the chest up to the shoulder and pin.
    • Smooth the fabric across the armhole and to the side and pin. You will want to add a little tension by stretching the fabric against the dress form to ensure a snug fit.
    • As you get to the waist, you will notice that you have to "force" the fabric a bit to get it to fit tight to the waist. This is okay!
    • Continue to smooth and fit the fabric down to the hipline.
    • To get the fabric to lay flat along the shoulders, you may have to slash the top of the fabric at the neck to release some of the tension.


    • Once you have your fabric fitted smoothly to the dress form, you can begin marking the side seams and armholes. You can also cut away excess fabric, but be sure to leave enough to add your seam allowance.
    • You can begin to cut away some of the extra fabric towards the bottom to start shaping the crotch of the bodysuit. Remember to leave enough fabric to add seam allowance. I left 5/8" at the crotch to fold over and stitch as my placement for the snaps.

    You can start marking your neckline to any shape you'd like. I went with a low scoop neck (not pictured here). Mark your desired neckline, and remember as you cut away excess fabric, leave enough for seam allowance. I used a 5/8" hem with a twin stretch needle to finish my neckline, so I made sure to leave 5/8" seam allowance. (I used 5/8" seam allowance for everything to keep it simple and easy).


    Repeat these steps for the back piece.

    ~For a symmetrical fit~

    Mark one side of your dress form completely and accurately. You can then take the fabric off of the dress form, and fold along that center front/center back crease that you made, and trace the marked side onto the opposite side.

    You can see in this photo that I have my back piece folded down the center back, and I cut both halves to match.

    Time to break out your serger!!!

    SEWING INSTRUCTIONS:

    • Stitch front and back right sides together, at shoulders and side seams.
    • Fold neckline and armholes in 5/8" and topstitch using a twin stretch needle (on regular sewing machine) for best results.
    • Fold each side of the leg openings in 5/8" and topstitch with twin stretch needle.
    • Fold the short edges of the crotch opening 5/8" and topstitch with twin stretch needle.
    • I used two sew on snaps for the closure. I sewed them towards the outer edges of the crotch opening like you would see on a regular once (lol).
    • You're done!!!


  • 10/1/2020

    Hello there! I am Alison O’Grady, a Maker with Janome America.

    October is a very special month for me because it is National Breast Cancer Awareness Month.  I’d like to share with you how my battle with breast cancer has altered the way I create my hand crafted wardrobe to be stylish and full of my own style!

    I was diagnosed in 2003 with breast cancer. It devastated me for a number of reasons including that I didn’t have a family history. I had just gotten a new lease on life and this was an incredible setback, or so I thought. Then I decided to take charge of my future starting with the things that brought me so much joy such as sewing.

    My breast cancer was Stage 3 with lymph node involvement. My treatment would require multiple surgeries including a bi-lateral mastectomy, chemotherapy, radiation and probable reconstruction and 5 years of daily drugs that had scary side effects. Was I up for it?

    Let’s back up a bit to before the cancer. I just met Chris through a blind date. He had been widowed for years, but was ready for an introduction. I quizzed him over the phone first that proved he could handle my personality! A fabulous first date told me that this was going to be something very special. After a period of months, I moved 2 hours away from my job, family and friends to pursue my second chance at happiness.

    But then I discovered the lump on my right side of my chest. I had no health insurance. I hadn’t been able to find work. Even though we did have intentions of getting married eventually, this moved it up under the circumstances.  Chris insisted that I get the care I deserved and we would find a way.

    The hospital took great care of me and of the mammogram. Then I saw the surgeon the next day. She said those 3 words that no one ever wants to hear, “You have cancer.”  Well, after  that appointment,  we knew we needed to tell my mom and some of my family members in person just what was ahead for me. At the family dinner to break the news, I said that Chris and I needed to get married, “in a hurry”. Then I quickly announced that I was not pregnant, especially at 43 years of age. I think my adult daughter was quite relieved about that revelation! Now I needed to plan a wedding to get our plan in action.

    It was an incredible wedding complete with more love, support and pink ribbons than I could have ever imagined. We didn’t need to plan a honeymoon because we knew that everyday together after cancer would be our lifelong honeymoon.

    A few days after the wedding, there would be the first surgery of 3, then chemotherapy treatments. I began to think that I should get busy creating the best wardrobe for chemo with matching tote bags, after all cancer is as good a reason as any to get sewing a new wardrobe. Not to mention matching hats for when my hair was gone.  I wasn’t going into the chemo treatment area without makeup, jewelry and stylish clothes! I was going to search for patterns that were going to flatter me differently, with a flat chest as I had a bi-lateral mastectomy. I searched out patterns that didn’t have bust darts. Patterns like tunics with interesting necklines and bodices were ideal. I could use some contrasting fabrics, embroidery, piping and on and on went my creative mind. I fired up my Janome Memory Craft 8000 and started sewing. It helped so much to keep my mind busy. The satisfaction that comes with making something to wear yourself, was just what I needed. I stayed away from wrap dresses and wrap tops. I knew that type of style would draw attention to what was no longer there. And that was okay. I WAS.


    I did do quite well with my chemo, bed-rest, radiation and following doctor’s orders. My sewing kept me happy and productive for every occasion when I would need to go out.

    When I was enrolled in the Master Seamstress Program back in 1995, one thing said by one of my instructors always stood out in my mind. “Choose a simple design in your pattern style and let the fabric do the talking.”  That seems to continue to be the key to my success in sewing after breast cancer. People aren’t attracted to my body, whether or not I have a bust, it is the fabrics and the way I showcase them on my body via design and pattern. There have been stitch outs that don’t make it out of the studio, but they become learning blocks. I either donate or re-purpose. I don’t let my sewing mishap defeat me. If breast cancer didn’t defeat me, an attempt at a different style of garment sure won’t. Chock it up to experience and continue on.

    After all of my treatments, it was time for the follow-up with my plastic surgeon.I had many conferences with my plastic surgeon about reconstruction as it is such a personal choice. He said that I would look fabulous in my tops and t-shirts after reconstruction. My response was, “Doctor, I don’t look good in a pair of jeans so I guess I’m all set with not having the reconstruction!” He agreed with a big smile and wished me health and happiness.


    I am still cancer free and I live everyday to the fullest. I’ve led many American Cancer Society events, spoken publicly about my experience, and encouraged other women who reach out to me after their own devastating cancer diagnosis.

    My new husband, Chris was diagnosed with prostate cancer 4 months after my diagnosis. He has since had melanoma where I watched the doctor stitch his temple up after removing his cancer. During the procedure, I mentioned to the doctor that she needed to pull those stitches tighter! Well we all needed that laugh. Chris’s prostate cancer returned last year, but he is now in remission. We were certainly meant to be together.

    I have added links to some of my favorite patterns, but there are many! Look for fabrics that you just love.

    Wiksten Shift Dress/Top

    Alder Dress

    Charlie Caftan

    Everyday Dress

    Bondi Top

    Cuff Top

    Fern Top

    Remy Raglan

    The Florence Top

    There are many tutorials out there about how to remove a bust dart in a bodice front pattern piece. If you have a pattern that you just love that has darts, use one of those to create a muslin and see if you like the results.

    Maybe my story or breast cancer doesn't affect you directly. Perhaps you can offer encouragement to someone you know or maybe sew for them.

    I’ve recently had the BracAnalysis to see if I carry the breast cancer gene.  I do not but I still got breast cancer. Please get your mammogram. Encourage your friends to as well. It saved my life. ♥

    Thank you for reading about my journey. I truly believe my work is not done on this earth. I have tons more sewing to do!

Prev 1 2 Next 

Tags

#freesewingtutorial 4th of July Applique Block of the Month Bunny Carolina Oneto Christmas Continental M7 Cosplay Cosplay Tutorial Costume Crafting Decorative Stitches DIY DIY Accessories DIY Father's Day Gift DIY skirt Embroidery Everyday Applique Father's Day Fiesta Weave Lunch Mats Fiesta! Four Fabric Quilted Project Bag Free Bag Pattern Free Pattern Free Quilt Pattern Free Sewing Free Sewing Pattern Free Sewing Tutorial free skirt tutorial Free tutorial Fun Projects Garment Sewing Good Tidings Quilt Along Green Goddess Dress Handmade Gifts Heidi Proffety Historical Costume Tutorial Holiday Sewing Home Decor How To How to Machine Bind How to Make a Quilt How to Make a Quilt. Free Quilt Pattern How to Make Panties How to Quilt How to Sew How to sew a top Janome Janome 9450 Janome AirThread2000D Janome Artisan Janome Artistic Digitizer Janome Conitential M7 Janome Continental M7 Janome HD3000 Janome Maker Janome MamoryCraft 15000 Janome MemoryCraft 15000 Janome MemoryCraft 6700p Janome S9 Janome Sewing Machine Janome Skyline S7 Janome Skyline S9 JanomeHD9 Lifestyle Machine Embroidery Maureen Cracknell MDW Melanie Call Memory Craft 15000 Moon Garden QAYG Quilt Block Mother's Day gift Napkins Patriotic Pattern Pillow Pillows Project QAYG Quilt Block Quilt Quilt As You Go Quilt Block Quilt Block Pattern Quilted Project Bag Quilting Quilting How to Quilt Rainbow Block of the Month Rainbow Quilt Block of the Month Rainbow Quilt BOM Reversible Zippered Pillow Rolled Hem Foot Scrappy Star Pillow Sew Sewing Sewing Machine Sewing Project Sewing Tutorial Skyline S9 SkylineS9 Stuffie Summer Sewing Project The Hype Tutorial Valentine's Day
DEALERS
The TWO Closest Dealers to you are:
1900 CENTRE ST , WEST ROXBURY MA, 02132
(617)323-6200
443 MOODY STREET , WALTHAM MA, 02453
781-893-3331
Find Additional Dealers