Cutting Instructions
Print the wedge pattern, 5 1/2" circle, 4 1/2" circle and 3 1/4" circle. Trace the wedge onto template plastic, transferring the base line markings. Trace the circles onto template plastic. Cut out the templates.
Cut the fabrics as follows:
White or Off White Kona Cotton--Cut the 3 yd length of fabric into two 54" lengths.
From the 54" lengths, cut:
Four 5" x 54" strips
Five 8" x 54" strips
One 1" strip
One 1 1/2" strip
One 2" strip
One 2 1/2" strip
Coordinating Print Fabric (quilt backing & wedges)
From the width of fabric, cut: One 6 1/2" strip
Set aside remaining fabric for quilt backing.
Tone on Tone Fabric (quilt binding & wedges)
From the width of fabric, cut: One 6" strip
Set aside the remaining fabric for quilt binding.
Fat Quarters (wedges)
Fat quarter 1 & 6, cut: One 8" strip
Fat quarter 2 & 7, cut: One 7 1/2" strip
Fat quarter 3 & 8, cut: One 7" strip
Fat quarter 4, cut: One 6 1/2" strip
Fat quarter 5, cut: One 6" strip
Construction Details:
Creating the Wedges:
• Sew a strip of Kona cotton to each strip cut from a fat quarter, using the following formula:
Sew a 2 1/2" strip to a 6" strip.
Sew a 2" strip to a 6 1/2" strip.
Sew a 1 1/2" strip to a 7" strip.
Sew a 1" strip to a 7 1/2" strip.
The 8" strips are cut without the addition of Kona cotton.
• Press the seams open on the strips. This will minimize the chance of 'show through' on the completed quilt.
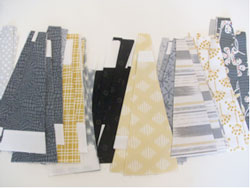
• Fold each strip in half, matching the ends. Place the wedge template on the strip, using one of the base lines to position the wedge. Cut along each side of the wedge using the ruler, rotary cutter and cutting mat.
• For the next cut, turn the wedge template 180° and line up a different baseline at the same time matching the edge of the template to the edge of the previous cut. Continue turning the template and cutting as many wedges as possible from the strip. Repeat for each strip.
Notice that the wedge template is asymmetrical, and by folding the fabric in half, varying the baseline, and flipping the template, the result is a very random collection of wedges, some with seams toward the base, some with seams toward the tip, and some with no seams at all!

![]()
Creating the Strips (Read instructions first before proceeding):
• Place an 8" strip of Kona cotton on a flat work space. Arrange the wedges on the strip, varying the direction and colours to create a pleasing arrangement. Stack the wedges to the side in the same order and direction.
• Work with three or four of the wedges at a time. Place the first wedge 8-9" from one end as your starting point. Space the wedges with a random distance between the wedges, remembering that the seams will change the spacing by approximately 1/2".
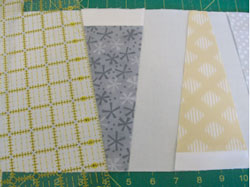
• With the rotary cutter and ruler, cut one side of the first wedge.

![]()
• Place the wedge on the strip of Kona cotton with right sides together. Match the edges. Notice that the edges are slightly offset to allow for the 1/4" seam. Sew with a 1/4" seam. Press the seam toward the wedge.
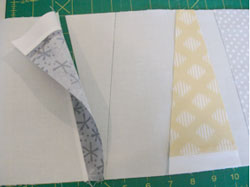
• Reposition the strip, keeping the edges parallel. Make the second cut for the second side of the wedge.

![]()
• Match the edges, with a slight offset for the 1/4" seam. Sew with a 1/4" seam. Press the seam toward the wedge.
• Continue adding wedges in this manner. Add additional strips of Kona cotton by overlapping the ends under a wedge and cutting through all layers. Discard the ends. The goal is to have a strip about 60" long, with 14 to 15 wedges in each strip and 8" of Kona cotton at each end. The spacing between the wedges will vary, but make a larger space every 4 or 5 wedges, leaving approximately 3-5" of 'negative' space. Look at the finished quilt as an example.
• Assemble 3 strips of wedges.
Creating the Quilt Top:
• Match each strip of wedges to a 5" strip of Kona cotton, with the strip centered on the length. Sew.
• Adjust the position of the wedges up and down until the design is balanced. Sew the units together. Sew the remaining 5" strip to the side of the strip of wedges. Press seams toward the 5" strips. From the right side, check for shadows from the darker colours of the wedges. Trim so that they don't show on the right side.
• Trim the outer edges of the quilt top to make a 42" x 52" quilt top.
Adding the Circles:
• From the leftover fabric, select a dark value and a light value for the appliqué circles.
• Using the template for a 4 1/2" circle, trace three circles onto the wrong side of the light value fabric. Cut out each circle, adding a 1/4" seam allowance to the edge. Turn under the edge of each circle and press.
• Using the template for a 3 1/4" circle, trace three circles onto the wrong side of the dark value fabric. Cut out each circle, adding a 1/4" seam allowance to the edge. Turn under the edge of each circle and press.
• Arrange the circles in groups on the quilt top. Pin in place.
• Using the template for the 5 1/2" circle, trace an additional circle for each group, overlapping a fabric circle.
• Thread the machine with bobbin thread in the bobbin and decorative thread in the needle. Place stabilizer under each traced circle and pin in place. Select a decorative stitch.
• Lift the edge of the overlapping fabric circle, and start the stitching under the edge. Sew along the marked line, around the circle to the opposite overlapped edge. Lift the edge and end the stitching under the overlapping fabric circle. Trim threads and remove the excess stabilizer. Repeat for each circle.
• Hand appliqué the fabric circles in place using a small blind stitch. Press the completed quilt top from the wrong side.
Quilting:
This is where the Horizon MC8900 really shows off! The Accufeed Flex, an integrated walking foot, provides a perfect even feed for quilting layers with perfect results!
• Layer the quilt backing, low loft batting and quilt top on a flat work area.
• Pin baste the layers or use Michele's favorite technique by hand basting the layers with large (1/2") stitches. Use a bright coloured thread, and baste around the outer edge. Baste along the 5" strips of Kona, dividing the quilt into thirds lengthwise. Baste across the center and each quarter of the quilt. The layers will stay together through the entire quilting process, and there are no pins to remove as you work.
• Set up the machine for quilting with the Accufeed Flex foot engaged. Place 50 wt thread in the bobbin to match the backing fabric. Wind 4-5 extra bobbins.
• Use 50 wt thread in the needle to match the Kona cotton.
• Locate the wide spaces in between the wedges of colour. Mark these areas for channel quilting using a ruler and wash away marker to connect the ends of the wedges. The channel will widen and narrow, and travel up and down. Quilt along the marked lines. Avoid quilting across the appliquéd and decorative circles.
• Mark a line halfway between the two lines of each channel. Again, the line will create two channels that widen and narrow, and travel up and down. Quilt along the marked line. Divide the channels again and quilt. Divide the channel a third time and quilt. There will be eight channels for each wide space.
• Use the same technique to channel quilt the top and bottom sections of the quilt.

![]()
• Locate narrow channels for quilting lines of leaves. Connect the ends of the wedges, and quilt along the marked lines. Quilt a wavy line down the center of the narrow channels. Leaves will be added with free motion quilting. Create three or four narrow channels.
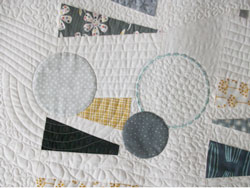
• Using the detail photo for reference, quilt concentric lines around the large appliqué circles. Use the edge of the foot as a guide for spacing, and avoid quilting across the channels and the other circles.
• Change the machine to free motion quilting.
• Free motion 'bubbles' in each of the decorative stitch circles. Add leaves to each side of the wavy lines in the narrow channels. Stipple quilt all remaining areas of the quilt.
• Trim the batting and backing to match the quilt top. Double check that everything is square.
• Cut the binding fabric into 2" strips and join to create a continuous strip approximately 200" long, enough to go around the quilt. Fold the strip in half lengthwise matching the edges. Press.
• Sew the binding to the quilt with a 1/4" seam, mitering each corner. Fold the binding to the wrong side of the quilt. Hand sew in place, covering the line of stitching.
• Remove any remaining basting thread.
Don't forget to add a label to your quilt, with your name and date the quilt is completed. Enjoy!