
Violet Craft loves to add a little bit of patchwork to her home every chance she gets. This Spring she has been admiring some contemporary watercolor quilts, also referred to as color washing. Her style frequently combines a little something classic with a little something modern and for this project she had the idea to use only one print and one solid to create a flowering heart pillow.
Look for areas of loose or solid background when selecting a print to work with. Then select a solid closely matched to the background color. For this example she chose Wild Carrot from her Madrona Road collection matched with white background . She had the perfect print in mind and her assistant agreed.

Janome Supplies Required
- Any Janome Sewing Machine – Violet uses the 1600P-QC and her daughter uses a DC2013
Fabric and Notions Required
Other Fabric and Notions Required:
- 1 sheet card stock
- Rotary cutting tools
- Fabric Required:
- 27 ½” square – Lightweight fusible interfacing
- ? yard print fabric
- ¼ yard background fabric
Instructions
Instructions:
- Cut a 27 ½” square piece of lightweight fusible interfacing. Most fusible comes in 20” widths, so you may have to seam two pieces as shown. Use a pencil and ruler to mark lines every 2 ½” horizontally and vertically to make a precise grid for our design or lay the fusible interfacing on a grid cutting mat to see the ruler lines through it.

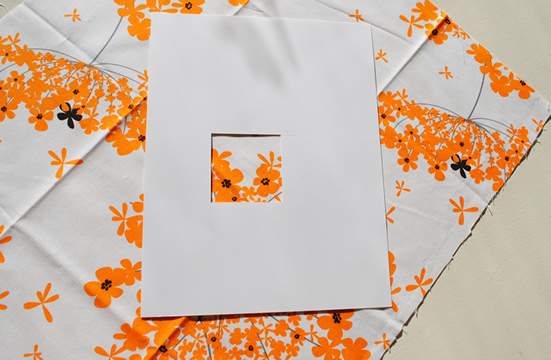
- Next “fussy cut” the pieces needed for the heart’s top and bottom points. To help find the perfect spots in the print, cut a 2 ½” square hole in the center of a piece of card stock. Use the paper to help find perfect pieces for points.
- After finding the four points for the heart, cut the remaining print fabric in 2 ½” squares.

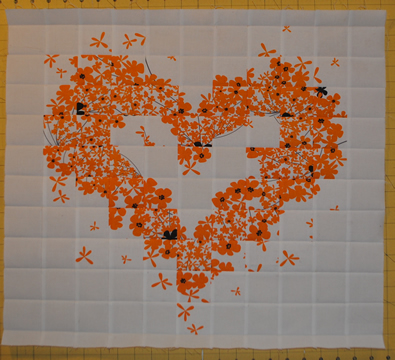
- Let the puzzle begin! Starting with pieces more solidly covered in flowers, fill in the main parts of the heart design. Look for pieces with solid white areas along the edges and match them to the curves of the heart. Move the pieces around to try the puzzle in several ways until you find the layout you love. Our example print has little petals floating in the background. I wanted to use some of these pieces and I floated them around the outside of my finished heart. Next, fill in the solid background squares in the center and around the furthest edges of the grid.

- Ensure all the edges are as straight and aligned as possible and carefully press your pieces onto the fusible interfacing. *To transfer my layout to the ironing table, I brought the whole mat to the ironing table and carefully slid the interfacing off the mat onto the ironing surface. *

- With right sides together, press an entire vertical row to the side and sew the seam.


- Press the seam to the side and repeat for all vertical rows. Repeat for all horizontal rows.

- I chose to make this block into a pillow cover. The example is quilted with diagonal quilting lines every ½”. The binding fabric used is Haystack from the Madrona Road collection.
Sewing with Junior Seamsters
This is a perfect project for kids. My daughter really liked the pillow I created and designed her own using Flight in black from my Waterfront Park collection matched with black background fabric. The overall loose print makes building your heart a simpler process. She uses a ¼” seam foot with guide to get perfect, straight seams. The speed regulation on her machine helps her control her project for a successful finish! She loves her pillow. After this photo was taken the pillow vanished to the depths of her tween room.

