by Michael Gardner
Dreams can and do come true. An intriguing thought and creative curiosity lead me to this very moment, creating my first make as an ambassador for a sewing machine company. As an optimistic thinker who always ponders the future, in 2014 when I began my sewing journey, this moment was not on my radar. I often reminisce about the initial feeling I felt embracing the idea of purchasing a sewing machine and learning to sew. My mom had purchased a sewing machine with the intentions of sewing her own nursing scrubs, she never took the machine out of the box. My sister took that same machine and began creating custom clothing. Observing her customizing sweatshirts with contrasting sleeves is what sparked my interest in the idea of becoming a sewer. My sister Ashley, who has been my biggest cheerleader in my creative journey, went with me to purchase my first machine and assisted in helping me get my notions as well.
Determined and eager to learn, I spent countless hours researching various sewing techniques, fabric options and pattern ideas. I gained knowledge of sewing lingo and decided to start the process with upcycling. Inexpensive women’s clothing I thrifted became my first way of learning and getting comfortable behind a sewing machine. I refashioned the clothing to fit Ava. I made so many mistakes and used my seam ripper way too many times, but it was a great tool to start before I spent money on good fabrics. I tried every idea that came to mind, I had nothing to lose. I felt free to create.

Thank you to content creators, the creatives who take the time to film and photograph tutorials. I am so grateful for these creators, they not only taught me to sew but helped me discover a passion that I profoundly appreciate. Their time, dedication, creativity and sharing of knowledge is helping so many people discover their talents. As I have grown over the years, my goal is to share my techniques and all that I have learned to help inspire someone to just start. With anything that is new, it is a process to start, learn and gain confidence. Along the way, I celebrate the obstacles I overcome, the fears I move past and the joy I feel after completing each project.
I have always been creative; my creativity has and always will be my most effective way of expressing myself. I have tried everything, when I discovered sewing it felt completely different than any other hobby or craft that I have tried. It seemed like I unlocked something hidden from within. My ideas flourished, often too fast for me to physically create them all. I find inspiration in everything that I see. Colors, patterns, prints, shapes, styles circulate in my mind. I usually cannot let go of an idea until it has been created. I am attracted to bold colors and vibrant prints that catch the eye and make you feel something. Pushing boundaries, stepping outside the box and having freedom of expression is how I thrive in creating.
As a self-taught sewer, I am extremely proud of my journey and accomplishments. I also self-draft the clothing I create. Visually I can see the pattern in my mind and that is my guide to cutting fabric. I do use previously made or retail purchased clothing as a guide. As I began brainstorming my first make for Janome, I was overthinking and somehow felt the need to change my process to utilize a commercial sewing pattern. I was wrestling with the idea, and honestly wasted so much time and energy before realizing, the way I create is what brought me here, it is how Janome found me. This opportunity is something I dreamed of, the hard work, dedication and consistency of just being who I am and sharing my work is why this has become my reality. Instead of becoming overwhelmed with the task, I channeled my energy and focused on bringing my vision to life. Creating my way, being myself and putting love into this make.
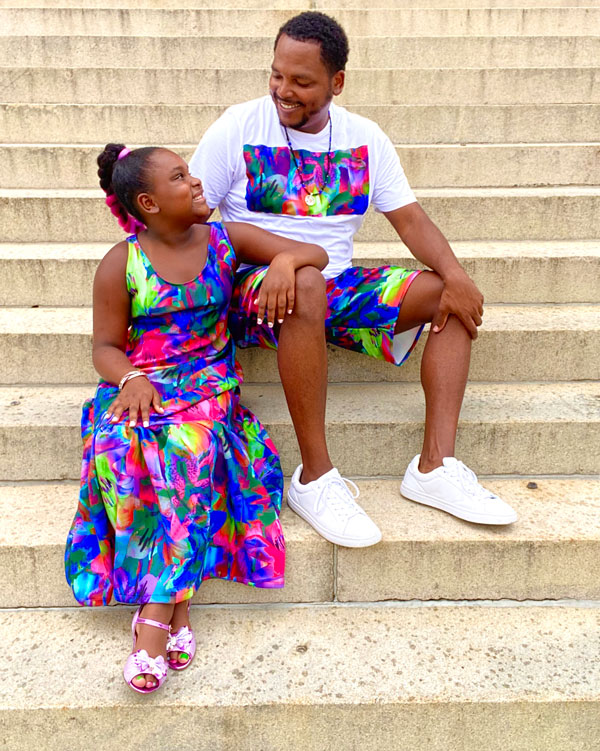
My bond with Ava is so special. We began this journey together six years ago and haven’t looked back. Sewing and modeling has bonded us in the most beautiful way. I am blessed to share my creativity with my daughter. She has embraced this experience and has flourished with confidence. The only way to commemorate this moment was to make a Daddy-Daughter coordinating outfit. I purchased a beautiful and bright floral print stretch fabric and knew it had to be something Ava and I wore together. Ava loves when we wear matching outfits, it is her favorite. Honestly, I love it too. It is fun to create and taking the photos together is a party for two, and of course our trusted tripod and clicker helps capture the magic.
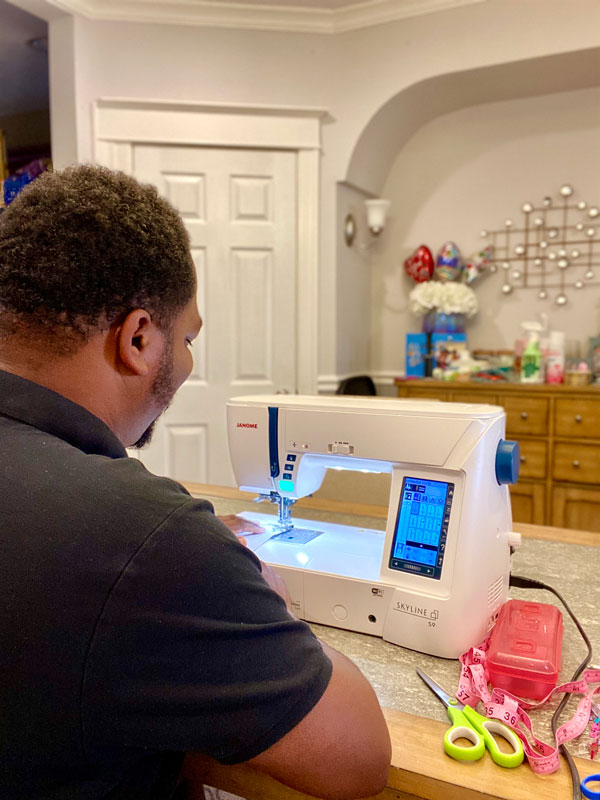
The Skyline S9 is absolutely amazing. This sewing machine is a complete upgrade in every way possible to what I was previously using. The touch screen, automatic threading of the needle and thread cutter, preset stitches, presser foot lift and start and stop button are a few of my favorite features. I am excited to learn the capabilities for embroidery next. For this project, I utilized the gathering feature. I have struggled with gathering fabric more times than I would like to share. The thread would always pop, I tried the yarn technique with no luck and usually I would just settle for doing pleats. When I discovered the gathering feature, I knew I had to try it and I am so happy with the results.
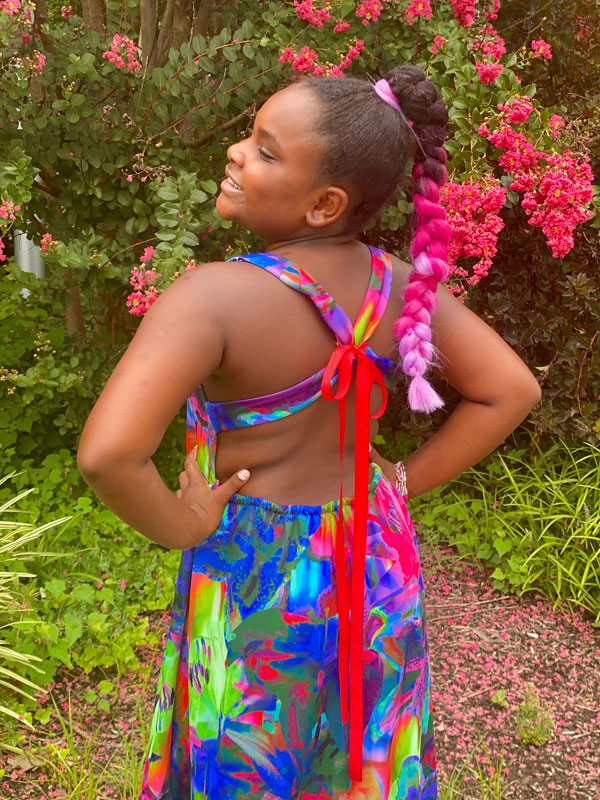
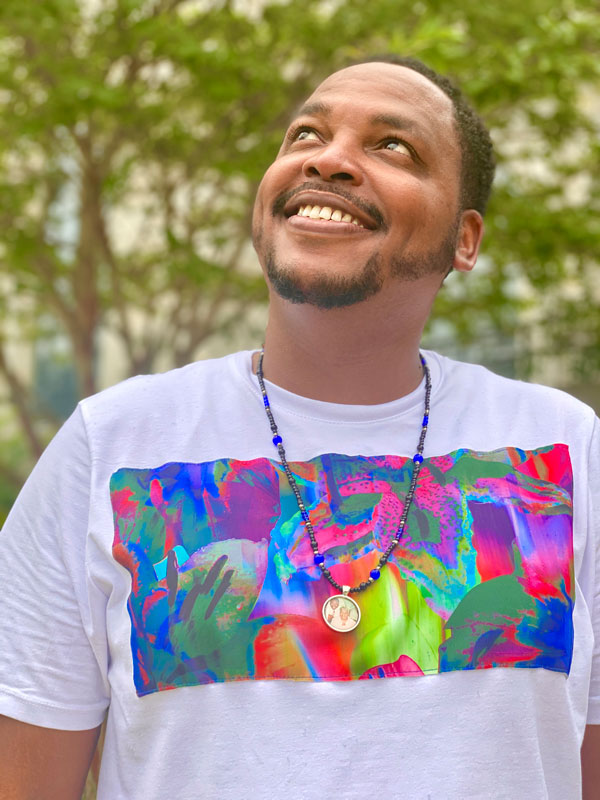
For Ava, I created a maxi dress with an open back, gathered skirt and ribbon tie. Her dress is self-drafted using a t-shirt for the front bodice, I used her measurements to create the back and added elastic. I doubled the measurement of the bottom hem of the dress, used the gathering stitch on the machine and adjusted it to match the hem which created a full ruffle skirt. For me, I created a pair of custom shorts with pockets and an elastic waistband. For the t-shirt, I topstitched a piece of the fabric to add a pop of color. I am continuing a tradition started years ago in my family by grandma. She sewed clothing for her kids. I wore a custom-made necklace by my sister in remembrance of my grandma while Ava and I took pictures. As I created our outfits, all I could think about is how proud my grandma would be seeing how far I have come in my sewing journey. She loved what I was creating for Ava.

I am so proud to be a part of the Janome maker family. Our first make for Janome is complete but this is truly just the beginning of our journey. The sewing community has been amazing to Ava and I. To know people you have never met, support, encourage and cheer for you is one of the best feelings I have experienced. The community has inspired me, the daily love and positive energy I receive pushes me to keep going. Looking forward to my next make.
"You can't use up creativity. The more you use the more you have." -- Maya Angelou
Follow along with Michael's amazing sewing on his Instagram page HERE (@daddydressedmebymg)